31 January 2011

Primitive Goodies Winner

Just a note to let you all know that the winner of our Primitive Goodies giveaway is Mary, of the Marmmies, Mammy's and More blog. I've emailed Mary with my congratulations and will ship her goodies to her this week. Thanks to all of my followers for taking the time to visit the blog and enter the contest. It is much appreciated. And we will be having more giveaways in the future...so if you didn't win this time, please try again next time!

Prim Hugs.


post signature

27 January 2011

Cinnamon Stick Bowl Fillers

If you're looking for some really easy but oh-so-prim primitive bowl fillers to make, then I think you'll really like these: my Cinnamon Stick Bowl Fillers.

I am always trying to think of ways to use supplies I always have on hand to make new primitive projects with, and that's how these little gems came about. All you need to make them are cinnamon sticks, pip berry stems, any homespun fabric that you like, and some rusty tin accents (I used rusty stars).

To make them, just gather 3 long cinnamon sticks (approximately 6" each) and tie them together with the homespun. Then tuck in some pip berry stems here and there on either side of where you tied your homespun. Then top them off with your rusty star or whatever rusty tin accent you've chosen by hot gluing it into place in the center of the homespun. 

You could make a whole bunch of these to put in a bowl as bowl fillers. Add coordinating colors of homespun and pip berries, or just go crazy and use whatever colors you like. Add in some dough ornies or rosehips for some extra fun. But these can be more than just bowl fillers too. Wouldn't they be cute on top of a gift package? You could also add them to the top of a napkin ring as decorative prim accent, or even just lay them around your dinner table for an extra prim touch at your next dinner party.

Sometimes the simplest things can be the most fun to make...and to share with prim friends.


post signature

24 January 2011

Coffee Filter Roses Tutorial

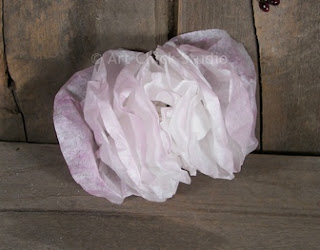
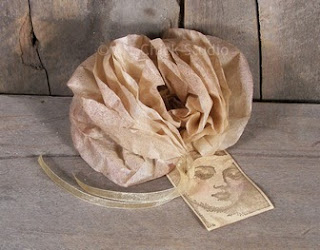
I just created a tutorial for some easy and fun Coffee Filter Roses on my Art Chick Studio blog, and I wanted to let you know about it. Since it's not necessarily a primitive craft project, (though you could add primitive touches to it) I posted it on that blog instead. But I figured I'd show you the finished examples here, and then give you the link to the tutorial in case you are interested. These are really fun to make and very inexpensive, and you can use either unbleached or bleached (white) coffee filters.

Coffee Filter Rose White

Coffee Filter Rose Vintage

I like the vintage feel of the unbleached coffee filter roses. But I also love the shabby chic look of the white roses. You could do so many different things with these. I think you're really only limited by your imagination. Follow the link below if you'd like to see the full tutorial, with lots of step-by-step photos.


post signature

23 January 2011

Primitive Goodies Giveaway

Well, I think it's time for our first giveaway at Tattered Sisters. I have gathered together a variety of primitive goodies to include in this giveaway that I think you will love.

You can't see everything in the photo that is in the giveaway, so I'll list them for you here.
  • A Primitive Notepad
  • A Primitive Crow Tin Cookie Cutter
  • A Set of Grungy Wooden Spools
  • A Bar of Handmade Primitive Soap
  • A Small Pips n Stars Primitive Candle Ring
  • A Set of Primitive Mammy Dough Ornies
  • A Package of Apple Strudel Grubby Star Tarts
  • A Chicken on a Corn Basket Resin Figure
Now, what do you have to do to enter? First, you must be a Follower (either by Facebook or Google). If you are already a follower, you already have one entry! If you're not a follower, becoming one will get you an entry. You can also get an extra entry by leaving a comment on this post (it can't be another post--must be this one!). Just note that if you're not a follower, the comment doesn't count as an entry. 

The contest will be open through January 31st. I'll contact the winner by email. So if your email address is not posted on your blog or no contact form is available there, be sure to leave a comment on this post and include your email address in the email field so I can contact you if you are the winner. I won't be keeping or sharing your email address (I hate spam as much as the next gal) and I will only email you if you win. And your primitive goodies will ship by Priority Mail once the winner is drawn at random.

Good luck everyone!

post signature

22 January 2011

Grungy Wooden Spools

Being the grungy addict that I am, I love finding new things to grungy up and look primitive. Wooden things are always fun, though some are more challenging to grungy than others. But something that I enjoy a lot are the Grungy Wooden Spools. 


I make these the same way to I do my Grungy Clothespins. I melt my wax in my Presto Pot and add my favorite scent (Cinnamon Buns). Then I dip and roll the spools in the wax to coat and immediately roll them through ground cinnamon. You can use other ground spices too, but I like just cinnamon for most wooden things. I leave the spools set as I do each one in that first dipping and spice-rolling. Then, after they've all been dipped and rolled, I roll each one in the melted wax again to seal them up. 

These make wonderful Primitive Bowl Fillers. They can be used alone or with other bowl fillers, or with your favorite prim fixins.


post signature

19 January 2011

Fixins Jar Tealight Lamp

I kind of have an addiction to Mason jars. I love using them for lots of things, especially around the house or as gifts. One day I was trying to think of a new primitive lighting idea that would incorporate one of my Mason jars, and this is what I came up with.


I took an empty Mason jar and filled the bottom 2/3 of it with some primitive fixins. I always have them around, and they look great as bowl fillers, so why not in a jar as well? I used unscented fixins, but you could use scented ones too. Then I tied on a strip of primitive homespun around the top of the jar, and I added a glass votive cup, which sits in the opening of the jar. If you use a votive cup that flutes out at the top, it will better fit the opening of the jar. Then I added a battery operated tealight candle...though if you're a fan of real tealights or votive candles, you could use those too. After that all that was left was to add a prim-looking lid for when the jar isn't in use. And there you have a Primitive Fixins Jar Tealight Lamp.


post signature

15 January 2011

Primitive Crow in a Bucket

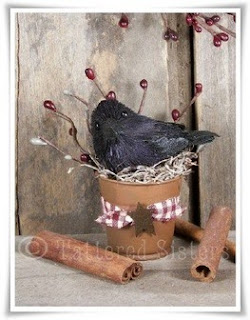
I love finding new crafts to make that involve primitive crows. For this one I found a couple of cute, fat-looking crows in an online craft store somewhere. So they were my starting point for this project.

Primitive Crow in a Bucket
I always have some mini rusty tin buckets around for my primitive craft projects, so I thought I'd have the primitive crow sit perched on top of the bucket. First I added some gingham homespun around the bucket and topped that with a rusty tin star (always a good standby for embellishing prim projects). Then I added some green floral foam inside the bucket. Next, I added some burgundy and green pip berry stems and stuck them into the foam. I covered the foam with some Spanish moss, to give it a touch of drieds. I always like the way that looks anyway, and it kind of looks like something a bird would have in its nest too. And the crow itself was attached to a wooden pick, so I just trimmed that down a bit and stuck that in the center of the floral foam. And voila: Primitive Crow in a Bucket!


post signature

13 January 2011

Primitive Snowman Globe Tutorial

Looking for a winter-themed craft project to create as decor for your home or as a gift? If so then this Primitive Snowman Globe creation is sure to please.

I found this adorable primitive snowman over on the Birchberry Farms Primitives blog.  Renee was kind enough to allow me to share the photo with you, along with a link to her wonderful primitive tutorial. To see the full tutorial, along with another photo, please follow the link below.


Be sure to leave Renee a nice comment if you like her tutorial. And tell her you found it through Tattered Sisters Primitives.


post signature

11 January 2011

My Prim Hoosier Cabinet and Table

The Hubs and I are fans of antiques, and of course I love primitives and primitive home decor. When we find or get something that is antique and primitive, that is a true treasure. And if something used to belong to one of our grandparents...that's priceless. And such is the case with our Prim Hoosier Cabinet...well, the top of it anyway.

Prim Hoosier Table
When my husband's grandmother died in 1999, while we were cleaning out her garage we found part of this old Hoosier cabinet. It was missing its bottom half, unfortunately, and it was covered in layer upon layer of paint. It was almost unrecognizable as a Hoosier, in fact, and the door panels for the two doors on the right were missing. But we loved it anyway and decided that a restoration was in order. 
My in-laws helped to strip the layers of paint, which is never an easy task. And for the most part it was in decent shape underneath--although the wood on the back of the wide open area at the bottom was fairly rotten and had to be replaced. We knew we were going to stain the wood to match our kitchen, as we both hate painted wood and much prefer stain since it brings out wood's natural beauty. But that back part was never going to look the same stained as the rest of the cabinet, so we decided to paint just that part to match our kitchen walls, and the Hubs stained the rest.

The missing cabinet door panels were another issue, but I quickly decided on a creative solution: stained glass. Luckily, I do stained glass and created a glass panel for each of the cabinet doors. I love how they turned out, and I think they really compliment the Hoosier. 

And of course the biggest concern was that entire missing bottom half of the Hoosier. What to do? Initially, we hung it on one of the walls in the eating area of our kitchen. But we remodeled last year and removed that wall, so the cabinet had to move. And since I didn't want it back on a wall, we went antiquing and found a nice old primitive-looking table to set the cabinet on. It's not as nice as a real Hoosier bottom would be, but it works.

This next photo just shows some goodies I have on top of the Hoosier...the bunny is from a prim ornie swap, and I just love him! The green pot is one I made myself in college on the potter's wheel. The cream-colored ceramic vase was made by a potter friend of mine. I also have a little prim pip berry willow tree there and an old stitchery I found at a garage sale years ago that reads, Home Sweet Home. There are some other items up there too, not visible on the photo.

Prim Hoosier Decor
I keep my cookbooks in the Hoosier, many of which belonged to my grandmother and great grandmother. Seems fitting that this Hoosier has become a tangible memory of both my husband's and my grandmothers. And hopefully one day it will sit in my granddaughter's kitchen...and remind her of me.


post signature

10 January 2011

Apple Turnover Dough Ornies

Don't you just love apple turnovers? I sure do. And these almost look good enough to eat (though I don't recommend it). These are my Apple Turnover Dough Ornies. 

Apple Turnover Dough Ornies
I made these dough ornies using my Primitive Dough Recipe as usual.The trick to making them is just using a round biscuit cutter to cut out a large circle first. Then I just moisten the edges of the circle with a little water, to help the edges stick together, and then I fold the circle in half. Then I pinch the edges together on the rounded edge to make them look more like a turnover. And that's really all there is to it. Sometimes I'll sprinkle extra cinnamon on the tops of the turnovers too, to give them a little more color. And I usually dip these in apple pie scented wax to seal them and give them a light apple scent. These make great primitive bowl fillers too!

post signature

09 January 2011

Grungy Prim Fixins Bag

I love having a nicely scented home, and I also love making my own Prim Fixins to scent it and add a decorative touch. The basic Prim Fixins ingredients are cinnamon sticks and rosehips, but you can add so many other things to them too. 


Dough ornies are great additions, as are any types of pods or other dried botanical items. There are so many ways you can display Prim Fixins, or even give them as gifts. I thought I'd share with you just a couple of things I do. 

First is to use a mason jar (I prefer the square masons) and instead of using the regular lid, I use a rusty frog jar lid. Generally frog lids are used for flower arranging in a jar; it allows flowers to stand up better in the jar when you use the frog lid. Not quite sure why it's called a "frog lid." LOL But what I like is that it gives you on open top, which allows your scented rosehips' aroma to come out of the jar. And the jar is just a nice, primitive touch. These make great gifts too; just be sure to put some plastic wrap over the top of the jar (but under the lid) so no smaller rosehips fall out.


Another great idea is also perfect for gift-giving, and that's to use a grungy muslin bag. Once I've grungy'd up my bag I take a stencil that says Fixins and use brown or black stencil cream and stencil that word onto the front of the bag. Then I put some scented Prim Fixins in a clear cello bag (just in case any fragrance oil might still be wet--you don't want it to seep onto the muslin bag) and put that inside the grungy muslin bag. It's so prim!


And you know what? You can also use these Grungy Prim Fixins Bags just as decor in your country or primitive home. They don't even have to have actual fixins in them! You can stuff them with newspaper or fiberfill and set the bag on a shelf or in a bowl. Just another idea. :o)
post signature

08 January 2011

Black Crow Dough Ornies

Dough Ornies are one of my favorite primitive bowl fillers to make. You can be so creative with them and they are so inexpensive, because you have most of the items right in your kitchen. And since I love primitive crows too, it was only natural to want to make some black crow dough ornies as well!


I use a dough recipe that is a combination of several different recipes I've acquired over the years of making primitives. (Click to view my Primitive Dough Recipe) But as you can see, these dough ornies are black. And yet I didn't paint them (painting a bunch of individual dough ornies is quite time-consuming, and I don't wanna to do that if I don't have to!)  I simply sprinkled in some powdered tempera paint when I mixed my dough. You can buy it at almost any art supply store. I start with probably a tablespoon and mix well, then if it's not dark enough I just keep adding more until it's the desired color. Warning though: your hands will become quite black during this process, so you might want to wear gloves if you want to avoid that! And just as an FYI, these dough ornies are shiny because I dipped them in wax once they were finished and cooled. I dip most of my dough ornies in wax to seal them. 

Powdered Tempera is a great way to add color to all of your primitive dough ornies and creations, without the hassle of having to actually paint them. Think of all the possibilities: red apples, red hearts, orange pumpkins, white sheep, green leaves (or orange, or red, or yellow!), yellow stars...so many different things you can do.

These dough ornies make great primitive bowl fillers all by themselves, or you can mix them in with your prim fixins or potpourri to give them an extra primitive touch too.


post signature

07 January 2011

Primitive Dough Recipe

Since I make a lot of dough ornies and primitive pantry cakes, I thought I would share my Primitive Dough Recipe with you. I've seen lots of dough recipes over the years, and there are lots of similar ones, and lots of different ones too. This one is the result of lots of variations and experimentation. These are the types of things you can make with this recipe...though you are only limited by your imagination!


Ingredients
  • 3/4 Cup of Shortening
  • 3/4 Cup of Sugar
  • 1/4 Cup of Brown Sugar
  • 1/2 Cup of Molasses
  • 3 Cups of Flour
  • 1 TBSP Cinnamon
  • 1/2 TSP Salt
  • 1/2 Cup to 1 Cup of Water (more or less)
Directions
  1. Cream together the Shortening and the Sugars in a large mixing bowl until mixed well.
  2. Stir in the Molasses, again until mixed well.
  3. In separate bowl, combine the Flour, Cinnamon, and Salt and stir to combine.
  4. Begin to alternately add your dry ingredients to the wet mixture. Add the flour mixture and 1/4 cup of the water at a time until ingredients are mixed and you have formed a good dough. At some point, it's best to just get your hands in there and start mixing, as it will quickly become a challenge to stir with a spoon! You may need to add a little more water or flour to get your dough to the correct consistency. You want to be able to touch the dough with your finger and have it not stick to it. So when that happens, it's ready.
  5. Shape your dough into a large ball. Cover it with plastic wrap and set in the refrigerator for 20-30 minutes.
If you plan to be using your dough for cut-out ornies (using cookie cutters, etc), what I like to do is sprinkle my counter with cinnamon. This helps the dough to not stick, but it also adds extra cinnamon to the outer layer of the dough, which I like. But this is totally optional. I also suggest you buy your cinnamon in large bulk containers; it's much cheaper that way...and get the cheapest cinnamon you can find. No sense spending a lot of money on something you aren't going to eat!

For cut-outs and small ornies (like the cinnamon bun ornies), bake these at 350° for for 15-20 minutes. It may be more or less, depending on your own oven. They will harden quite a bit while cooling. Just be sure they're cooked through and let them cool completely.

For larger items like pantry cakes or very large cinnamon buns (I've done full size ones on occasion), I usually bake them at 325° for 20-30 minutes, again, oven times will vary, and the thickness of your item will be a big factor too.

And if you're going to dip your ornies or other baked dough items in wax, just make sure they are cooled completely before doing so.


post signature

06 January 2011

Grungy Hang Tag Tutorial

I've gotten asked several times for my Grungy Sauce Mix recipe, the one that I use to create all my grungy hang tags and other grungy goods. Since I mention it on my Art Chick Studio blog as well, I get asked about it there too. So I thought I would write a Grungy Hang Tag Tutorial and share that primitive recipe here. I'm also linking this up at Tutorial Tuesday with Hope Studios.

First you'll need your Grungy Sauce Mix ingredients and supplies:
  • Instant Coffee (get the cheapest you can find...I always buy generic)
  • Vanilla or Imitation Vanilla Extract (again, go cheap if you want to; I use good vanilla for baking so I always have some on hand. But if you're not a baker just get cheap imitation vanilla!)
  • 2 Cups Hot Water (I just nuke it so it's hot enough to dissolve the coffee, but not hot enough to burn my fingers while I'm working.)
  • Ground Spices (this is totally optional and I only use it occasionally; I mostly use cinnamon)
  • A Bowl
  • A regular spoon or teaspoon
  • Plain Hang Tags

Step 1: Mix up your grungy sauce. Take the 2 cups of hot water and to that add twice as much as the directions tell you to. Mine says 1 TSP for each 8 oz cup, so I use 2 TSP for each cup. You want the grungy sauce good and dark, so really, you can add as much as you want. (My photo doesn't show all 2 cups of the mixture...just FYI.) Also add 1 TSP of vanilla, and your ground spices, if you're using them. Just a little sprinkling of spices will do.
Step 2: Dip your hang tags. Now you can do this one of two ways. 1) Dip the hang tag as it is, or, 2) crinkle and wrinkle up the tag first. Either way is fine. Wrinkling first just allows the sauce to get in all the cracks and crevices and gives it more texture and dimension. So do it however you like. Just dip them in and out of the sauce mix a few times, then let the excess liquid drip off into the bowl.


Step 3: Air Dry or Bake your hang tags. I always bake my hang tags to speed up the process, but this is not required. Baking can make the grungy effect a bit darker, which I prefer. Many people just lay them on a cookie sheet to air dry. Some people set them in the sun to bake that way. It's totally up to you. I bake mine at 200°, for just a few minutes on each side. Watch them closely. Nothing takes the fun out of this project quicker than seeing your hang tags on fire in the oven!

Once your hang tags are good and dry, you're ready to stamp them, create altered art, or whatever else you might like. The unwrinkled ones will look a little something like this:


And the wrinkled ones will look a little something like this:


I hope you find this primitive tutorial  helpful, and I hope there are lots of grungy goods in your future!


post signature

05 January 2011

Primitive Crows Grungy Hang Tags

Somewhere along the line, crows became a symbol of all things primitive. So you see them a lot in primitive crafting and home decor. I love the look of those black birds, especially when crafting. So here are some examples of some really simple primitive crow hang tags I created.


The first step begins with plain manila hang tags that you can buy at any craft store or even office supply store. Then these plain hang tags have to be grungy'd up to become primitive grungy goods. To see how to create your own grungy sauce mix and make grungy tags, just check out my Grungy Hang Tag Tutorial.

Once my tags are good and grungy and have dried completely, the next step is super easy:  I just use my favorite crow rubber stamp to create the image on the grungy hang tag. I make sure to ink up  my stamp well with black ink and then just stamp away. And the great thing about primitives is, if your stamp doesn't print perfectly, it's no big deal. Primitive isn't about perfection. It's simple and rustic, and that's all it needs to be!

I love making grungy hang tags. And I do more than just stamp on them. I use them for altered art projects and mixed media style art too.


post signature

04 January 2011

Primitive Spoon Rack

Well, can you ever really have too many spoons? This Primitive Spoon Rack is one of my favorite Primitive Finds that the Hubs and I found at a garage sale in Grand Rapids (OH) one day a year or two ago. It was only $10, and I just loved it the moment I saw it.


It's all worn and distressed, which is really the best part about it. And all the spoons came with it too, so it was like Christmas in July when I got it. :)  And there's another one of those adorable primitive dolls that I got through a handmade ornie swap at Prim Mart. I actually got two of the same ones by mistake. But that was OK with me. That little gal is so darn cute, I didn't mind getting two of them! I just thought the shelf needed a little something on it other than spoons, so I sat the doll up there. She looks right at home, don'tcha think?

post signature

02 January 2011

Primitive Shelf in the Kitchen

I have shelf unit in my kitchen where I keep lots of primitives and antiques. I change things up on the shelves once in awhile, especially if my hubby brings home some newly discovered antique bottles or something (which he does quite often). I thought I'd share a photo of one shelf on that unit that is full of a variety of antique and primitive goodies.

There are 3 antique bottles on this shelf; the Hubs found each of those under a different house in town. He's a plumber and a contractor, so he's actually digging under and around people's houses all the time. So he often brings home some little bottle or what-not. You'll also see a glass chicken dish, which is an antique and used to belong to my great grandmother. The little white mug and old domino are two more items the Hubs found under a house (might even have been ours...it's hard to keep track). The 2 tins are reproductions of old spice cans. The miniature butter churn is one we found at an auction somewhere. I just thought it was cute so had to buy it. There are also a few random resin chickens here and there (I seem to have a chicken theme on this shelf, now that I think about it); and there's a cute primitive doll that is part of a handmade ornie swap from Prim Mart.

The one really special piece on the shelf though is in the left-hand corner in a frame. It is the antique sole of a shoe that my husband found underneath our home during one of our many remodeling projects (it only took us 15 years to gut and remodel every single room in our 1890 house!). I loved that little find, because it just made me wonder what the shoe looked like. And it also made me wonder what the child looked like who might have worn it, and did they wear it while walking in our house? So I decided to frame the old sole, and I added a caption to it that reads, Footsteps of the Past. Seemed very appropriate for this truly timeworn treasure.

post signature

01 January 2011

Primitive Dolls at Home

Thought I'd start sharing some more photos of primitive home decor around my house from time to time. As I've mentioned before, I don't really go all out with primitives. I do love them, but I like to use simple prim touches rather than wall-to-wall prim in each room of my home. 

This photo is of a corner in my living room where I have two cute primitive dolls. I just call it the doll corner. It's kind of lonely right now, as there are only 2 little dolls sitting there. But I'm not a doll collector, so that's just all I happen to have. I'll tell you though, if I do come across a primitive doll that I love, I will definitely buy it. I do think my little doll corner needs to have one more doll sitting there. 


The largest doll is one I bought from a Prim Mart member. I just saw this doll she had advertised for sale and I fell in love with her on the spot and had to have her. The small doll is one that actually came from a primitive ornie swap on Prim Mart. I think she is so adorable, and I loved her so much I didn't want to pack her up with my other ornies and hide her away. So there she sits, in my little doll corner.

post signature