Showing posts with label Primitive Fall. Show all posts

09 October 2015

Favorite Fall Primitives

Hey, all. I thought since I haven't posted in awhile I would put together a post to highlight a collection of my favorite Primitive Fall projects from the past. This will be a way to share projects with my longtime readers, and new readers, that I have really loved creating since I started the Tattered Sisters blog. And hopefully it will get you inspired to make some new Fall projects, since Fall is finally upon us!

So let's begin with one of my favorite creations, and one of my most read posts on the blog. And that is, for my Ginger Citrus Simmering Spices.

Ginger Citrus Simmering Spices

If you've made these, you know already how wonderfully delicious they smell, and how they really make your home smell like Fall! If you haven't made them yet, what are you waiting for? And if you need the recipe, just click on the image and it will take you to the blog post where you can find it.

Next up are my grungy Boo Bags. 


Boo Bags

These were so easy and fun to make. You know I LOVE Grungy Goods anyway! But these were great because I made them as little treat bags just for Fall or Halloween. If you'd like to make some too, just click on the image and it will take you to the Boo Bags post.

Let's also remember the Primitive Putkas in a Jar that I made. I love finding new ways to use Mason Jars, especially for gift-giving. So when Fall is at hand, these are a really quick, easy, and very fun gift to give your primitive friends, especially if they like scented items.

Prim Fixins Putkas in a Mason Jar

Just scent your putkas, put them in a rusty frog jar lid, add some homespun, and it's a gift! A really good smelling gift too.

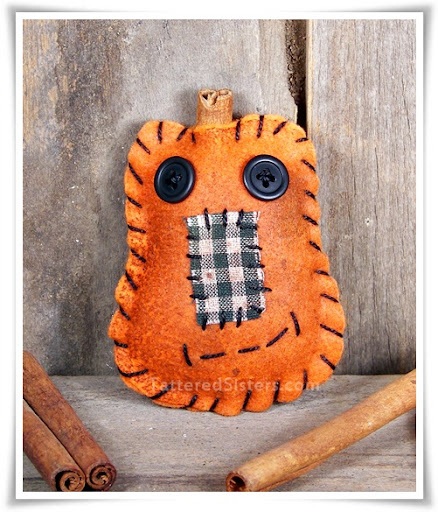
Here's another fun craft I made awhile back, my Grungy Primitive Pumpkin Ornie.

Primitive Pumpkin Fall Ornie

Any of you who have read my blog for awhile know that sewing is NOT my favorite thing. But on occasion, I do like to make ornies, because they're just cute and they require minimal sewing. I loved making this little guy, and I see his face show up in my Pinterest feed a lot, so I know other folks like him too. :)

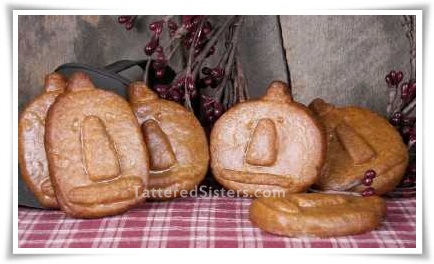
Oh, I also loved making this Primitive Pumpkin Jack Dough Ornies.


And their mini Pumpkin Jack Dough ornies friends. 

Mini Pumpkin Jack Ornies

I love dough ornies! They are so fun, and pretty easy to make too. And they make great gifts. I make all my Dough Ornies with the same basic recipe, which you can find here:


And let's not forget, this Pumpkin Muslin Bag was a super easy Fall primitive craft.

Pumpkin Muslin Bag

They are also perfect little treat bags for Halloween. Click on the image to view the full blog post on how I made them. And you know, you could make a pumpkin face stencil to make the faces on these bags and use rubber stamp ink or paint to make a whole bunch of these bags in relatively short order. You could even get the kiddos to help!

And one last item as I travel down my Primitive Fall memory lane, this was one of my favorite primitive freebies that I created to share with you.  My Fall Pumpkin Tags.

Fall Pumpkin Tags

That pumpkin tag freebie is still available for FREE download. Just lick on the tag image and it will take you to the PDF file that you can download and print, in case you missed that original post. 

I hope you enjoyed this little treasury of my favorite Fall Primitives. Which one was your favorite? I also hope you have an absolutely fabulous Fall this year as well!

Happy Fall, Y'all!

10 November 2014

Primitive Fall Decor

Well gang, I haven't been in the studio much recently, since I've been kind of obsessed with working on genealogy of late. I'm sure I'll get back in there at some point soon, but until I do I didn't want you to think I'd forgotten about you. ;) So I snapped a few pics of some of my Primitive Fall Decor to share with you.

This is a Primitive Sheep that I have sitting on my hutch. 
I didn't make it, mind you. It was a gift and I love it.
I put it out every Fall.

Primitive Sheep

This is a centerpiece I have on my dining table. 
Now I DID make this centerpiece myself, quite a few years ago.
It's not really primitive, so I occasionally some prim things around it.
Can you spot the little prim goody in there?

Fall Centerpiece

In case you can't quite see it...it's this cute little Primitive Mouse
sitting on a Primitive Pumpkin!


I don't decorate for Fall as much as I used to, but I do enjoy the few things I do put out around the house.  I have a feeling that once we move to the Farm (hopefully next year) I'll feel like decorating more. But for now I'm content with what I put out each year.  And the less I put out makes it easier to put away, especially with Christmas right around the corner--and I like to decorate right after Thanksgiving whenever possible!  How about you?

22 September 2014

Primitive Sunflower Topiary

As I was trying to decide what craft project to do in the studio this weekend, I was walking around the house and spied some grungy fabric sunflower bowl fillers I had in a bowl on my dining table. I grabbed one and decided I would use that somehow in my project, though I didn't know how at that moment. After I got into the studio and looking around in my stash o' stuff, I found a Rusty Tin bucket and knew then that a Primitive Sunflower Topiary would be perfect.

Primitive Sunflower Topiary

I used an old stem from some Pip Berries as the sunflower stem. I used a couple of pip berry sprigs as the leaves. And to the rusty tin bucket I added some Fall-colored homespun for an extra pop of color. Spanish Moss surrounds the flower, which I use a lot in my crafts. And voila: Sunflower Topiary.

15 September 2014

Pumpkin Pickins

I bought some little faux pumpkins at Wally World during the week, so I thought I'd play with them in the studio a bit over the weekend and see what I could do with them. My intention was to grungy them both up to be primitive. But I decided to do different things to each one in the end and came up with two very different pumpkins.

This first one is kind of grungy. I had intended to put cinnamon on it, but then I changed my mind and decided to play with ink instead. I used a dark brown color first because the pumpkin was a very bright orange color. Once I'd gotten that on I took an orange-ish color of Distress Ink and added some highlights back in where needed to contrast with the darker brown. I also used just a wee bit of orange acrylic paint in the pumpkin seams to brighten them back up a little. The result is below--and it does have a bit of a grungy appearance, just not as grungy as I'd  normally do.

Grungy Pumpkin

 This next photo shows the two inks I used to create my grungy effect on my pumpkin.
Ink Supplies

This next pumpkin isn't really grungy--and not really even prim. LOL. But I had fun making it anyway. I used some mat medium as my adhesive, and then I sprinkled on some bronzed mica flakes for a shimmery effect. It's definitely got some sparkle going on! Kind of looks like a Fall fairy came along and sprinkled on some fairy dust. :)

Mica Pumpkin

Mica Flakes

These were fun little pumpkins to make. I love Fall, so it's always fun to make more Fall crafts.

01 September 2014

Grungy Primitive Pumpkin

I saw a post on Facebook recently that showed how to make a small pumpkin using a roll of toilet paper that had been cut in half width-wise, then wrapped with fabric strips. I wanted to try it out for myself, but I really didn't want to waste an entire roll of toilet paper to do it. What can I can say--to me, toilet paper is a valuable commodity. ;) But I knew I had some Styrofoam balls tucked away in my studio, so I decided to give one of those a try. And this was the result. 

Grungy Primitive Pumpkin Decor

I cut a small slice off the top and bottom of the Styrofoam ball to help it sit flat, and look more like a pumpkin. Then I used a fat marker to hollow out a column down the center of the ball, so that I could wrap the fabric strip. I just shoved it down the center of the ball and pushed out the foam.

I used one very long strip of torn fabric--it wasn't muslin, but I'm not even sure what kind of fabric it was. It's just what I had on hand (it's what you see under the pumpkin in the photo as well). I tucked the end of the fabric into the center of the ball and then started wrapping the strip of fabric around and around, overlapping each strip a bit as I went all the way around. Once I got the ball all wrapped with fabric, I tucked the remaining end in the center of the ball too. I somehow managed to tear a strip of fabric that covered the entire ball. I don't think I could have planned that--it was just luck. :)

After that, I picked two colors of spray I had in the studio--one was Glimmer Mist by Tattered Angels in Copper; the other was a dark brown color--I believe it was by Mr. Huey's. I used the Copper color first, since it results in a nice dark orange color on the fabric. I sprayed it all over the pumpkin. Then I just added some of the brown spray here and there to give the color some variation. I dried it all with my heat gun, then went out into the yard and found a stick that could be my pumpkin stem and I stuck it in. 

Voila. Grungy Primitive Pumpkin! You could really make several of these fairly quick and they'd make great table decor for the Fall. You could do more to embellish it, of course. Add some rusty wire, or a leaf, or pip berries, or any number of things really. But I was going to for simplified here. Primitive and rustic. Sometimes that's really all we need.

11 November 2013

Primitive Harvest Pumpkin Magnet

Well, I finally made it back into my studio over the weekend. It felt good to get back in there. :) I wanted to make something for Fall but I wasn't sure what to make. Something led me to some blank wood shapes I had sitting around, so I decided to create this Primitive Harvest Pumpkin Magnet.

Primitive Fall Pumpkin

I painted it an orange color first and then grungy'd up the edges of the wood with some distress ink. Then I stamped on the pumpkin and the word, Harvest. Then I added some leaf rub-ons that I happened to have tucked away. I added a few paint highlights to the pumpkin too, though you can't really see them in this photo. And I added a magnet on the back so I can hang it on my refrigerator. :) It was just a simple little Primitive Fall magnet, but it was fun to make.

04 November 2013

Fall Pumpkins Tags Freebies

I haven't been crafting as much lately--just can't seem to get motivated for some reason. But I didn't want you to think I'd abandoned you all together! So I created something to add to my collection of Primitive Freebies here on the blog. So here are some Fall Pumpkin Tags that I've made for you. This is what they look like.

Fall Pumpkins Tags Freebies

These could be used as gift tags, bag toppers, or even as place cards for your Thanksgiving table. The free download has 6 of these on one full sized sheet, in PDF format. No watermark appears on the downloadable tags. Just click on the text link below and you'll be taken directly to the download.


As always, please remember that these tags are for your personal, non-commercial use. They are not to be listed for sale (anywhere), nor claimed as your own.

24 September 2013

Pumpkin Muslin Bag

I was playing with some Muslin Bags in the studio the other day and decided I'd create this Pumpkin Muslin Bag for Halloween. If you remember my Grungy Boo Bags, I had fun creating those and wanted to create something different this year that could be used for treats. So that's how I came up with these.

Primitive Fall Pumpkin Muslin Bags

As always, I used a pre-made muslin bag for this. Then I knew I wanted the bag to look orange, but also sort of Grungy at the same time. So I looked through my various bottles of sprays and found a copper spray, made by Tattered Angels. I tested it on some scrap muslin first and it looked perfectly orange, so I went ahead and sprayed my whole bag. But I didn't spray it enough to make it solid orange--because I wanted it to look grungy too. Once that dried I drew on a jack-o-lantern face with pencil, and then just painted it with black craft paint. That's really all there was to it!

These would be great for treats, but also just for decor on a shelf or something. Very quick and easy to make.

18 September 2013

Mini Faux Caramel Apple

Well, it's that time of year again. You know, Primitive Fall. :) Leaves are starting to fall, mornings are cool, and sweater weather will soon be upon us. And all I can say is yay! I love Fall. And it's already inspiring lots of things I'm seeing on Pinterest and on other blogs.

One thing I've been seeing for the last year or two is faux caramel apples. I've been wanting to make one, but I was hunting all over for my plastic apples I had and couldn't find them. Very frustrating! All I could find was my mini plastic apples--the small ones I just use for little craft projects. But hey, I'm nothing if not improvisational. So I gave it a shot, and this Mini Faux Caramel Apple was the result.

Primitive Mini Faux Caramle Apple

OK, it's not perfect. I couldn't even find my crushed corn cob so that I could make it look like it has faux nuts on top. Urgh! I swear there are some fairies playing in my studio and moving my stuff! But anyhoots, it was an experiment, and at some point I'll be able to try it on some bigger apples. All I did was mix white glue with some caramel-colored acrylic craft paint. I drizzled it over the apple while it was setting on some wax paper, and then I let it dry. If I'd had the crushed corn cob I would have sprinkled some on while it was still wet. That would have made it much better (dang fairies!). Then I just grabbed a stick from outside and stuck it in my apple and added a homespun tie.

It's not too bad, right? Full sized ones would be so cute sitting around as Fall decor, or even as gifts, don't you think? If you do a Google Image search for "faux caramel apples" you will get some cool results to check out for inspiration.

01 September 2013

Mini Pumpkin Jack Dough Ornies

As soon as it's September, I start think about Fall, don't you? I look forward to the crisp, cool air, the changing colors of all the leaves, and the return of baking season! And what's more perfect for fall than Primitive Pumpkins? So here are some cute little Mini Pumpkin Jack Dough Ornies.

Primitive Pumpkins Dough Ornies

Throw these into a bowl of putka pods or scented rosehips, and you've got some cute decor for either Fall or Halloween. They are fairly small, only around 1" tall, so they are really cute and prim. As always, I use my Primitive Dough Recipe to make these. And I used in a silicone mold to make the pumpkins, in case you are wondering. I put the dough in, then pop them out and bake them on a cookie sheet. Easy peasy.

I bet you've got something fun cooking up for Fall too, don't you?!

05 August 2013

Pumpkin Apple Rusty Tin Bucket

Well it's August, so naturally I'm think about Fall. LOL. I can't help myself. I love Fall, so when back-to-school time gets closer I really start thinking about a Primitive Fall and Fall crafts, and cooler weather, of course. So while I was in my studio over the weekend working on some paintings and such, I decided to create this Pumpkin Apple Rusty Tin Bucket decor.

Pumpkin Apple Rusty Tin Bucket Home Decor

I took a Rusty Tin bucket and added a homespun tie to it. Then I filled with some pumpkin-scented putka pods (mini pumpkins). I stuck in some long cinnamon sticks here and there, and then I added just a few craft apples too.

This would make a nice centerpiece on a table. It would make a nice gift too.

08 July 2013

Primitive Pumpkins

What is it about July that makes me start thinking about Fall? That's kind of weird, don't you think? LOL. But for some reason, once mid-summer is here my head goes to Primitive Pumpkins and everything Autumn. So I just thought I'd share some Primitive Fall inspiration, in case you're like me and thinking about cooler weather and falling leaves--while the air conditioning is still on.

Primitive Pumpkins Putka Pods

Putka Pods are perfect for Fall because they look just like miniature pumpkins. I love them because they are so easy to add scent to, since they are much more porous than rosehips. They hold the scent really well and a little fragrance oil goes a really long way with these little guys. There are also lots of ways to package putka pods: in a jar, in little pouches with creative labels, in a clear cello bag, or how about a burlap bag with a pumpkin image stamped onto it--or maybe with a vintage pumpkin seed label? I think the ideas are pretty much endless.

So there's some pumpkin and fall inspiration for you. We now return you to your regularly scheduled summer. :)

12 October 2012

Cinnamon Salt Dough Recipe

I love making Dough Ornies, but I wanted to try a new recipe, so I thought I'd try a Cinnamon Salt Dough Recipe. This Primitive Recipe is pretty common, and has lots of variations. I think it's a very flexible recipe that you can't really mess up. I used my own variation to create these Primitive Fall dough ornies to use as Primitive Bowl Fillers.

Fall Acorns Dough Ornies Bowl Fillers

Fall Leaves Primitive Dough Ornies

The Recipe
  • 2 Cups Flour
  • 1 Cup Salt
  • 1/4 Cup Cinnamon*
  • 1-1/2 Cups Water
Mix all the ingredients together and work into a dough. You can add a little extra water if the dough is too dry, or a little extra flour if the dough is too wet. Knead the dough several times. Then you roll it out onto a surface dusted with cinnamon, and to your desired thickness (at least 1/4"). Cut out with cookie cutters of your choice. Bake at 300° for 45-60 minutes, making sure to check them during the last stage of baking so that they don't overcook or burn! The thicker they are, the more baking time they're likely to need. Let them cool completely before you handle them.

After mine were finished I used some diluted craft acrylic paints to kind of give my ornies a wash of color. For the acorns I just did the top half of the ornies so they would look more like acorns. For the leaves I painted the entire shape, using various colors to look like fall leaves. You don't have to dilute the paint if you don't want though, it's up to you. I just didn't want a very dark color on my ornies.

These can be sealed with melted, scented wax, as I do with most of my dough ornies. Or, you could purchase a spray to seal. Krylon makes a clear acrylic spray paint, and they also make a "triple thick clear glaze" you could use.

*A note about the cinnamon: I used a small portion of cinnamon so that my ornies didn't get too dark. If you are planning to make ornies that you DO want to be darker, like for gingerbread men, for example, you can use an entire cup of cinnamon. The more cinnamon you use, the darker the ornies will be. I knew I was going to paint some of mine so I didn't want them too dark. Do yourself a favor though and get your cinnamon at the dollar store, if you have one nearby. It will much more affordable!

01 October 2012

Grungy Jar

I decided to try some of my grungy addiction out on a Mason Jar. I just wanted to see how it would look to use some of the textured spray paint I use so often on the jar. So I used some of the spray and got the Mason Jar good and grungy.

Grungy Mason Jar with Spray Paint
First thing to note is that the textured spray paint I used is NOT meant to be used on glass. 


It is an indoor/outdoor paint, but it doesn't say on the can that it can be used on glass. So I just figured I should err on the side of caution and not expect it to hold up...unless I primed it first. So I used an indoor/outdoor spray paint primer on the Mason Jar first, one that clearly states it can be used on glass. Krylon was my primer of choice. So I primed the jar first with a Ruddy Brown color, let it dry, then used my textured spray paint to grungy up the jar. It probably won't last forever, but I'm sure it'll last awhile.

I created a label for the jar with some of my favorite fall Primitive Pumpkin graphics and stuck that to the jar--I added Mod Podge to help it stick. Then I topped it off with a homespun tie. Obviously you can do this to candles in a jar, but you can do it to plain jars too. Put something fun inside--like scented putka pods (mini pumpkins) and use it as a hostess gift or what not. Put some candy corns inside, or some M & M's. It makes a perfect Primitive Gift!

25 September 2012

Gingerbread Men Dough Ornies

It feels like Fall, y'all, and I'm loving it. So what is something that goes great with Fall? Gingerbread! And who wouldn't love some Gingerbread Men Dough Ornies to help them decorate for the season?

Primitive Gingerbread Dough Ornies

Primitive Mini Gingerbread Dough Ornies

Bot of these sets of Dough Ornies were made with my Primitive Dough Recipe. They are just different sizes, the ones on the bottom being the mini gingerbread men. I seal them up with Gingerbread scented wax. Just keep in mind that the scent on dough ornies like this is not as strong as it is on a candle. With candles, the scent is all the way through the candle itself; with the ornies, there is really only scent on the surface. So it's not going to be strong and the scent won't last forever. But the cuteness will last a good, long time. 

Put some of these dough ornies in a basket, or in a clear cello bag with homespun tie and you have a great gift. Throw them in a bowl with some rosehips, or even add in some mini pumpkins (putka pods) and that would look great on a table. 

24 October 2011

Pumpkin Jack Tag Freebie

I love Primitive Freebies, don't you? That's why I like to make some freebie hantags and Primitive Graphics to give away here at Tattered Sisters from time to time. And since it's still Fall, I'm sticking with pumpkins. So I've created this Pumpkin Jack Tag freebie for you.

Pumpkin Jack Tag Freebie

Click on the image to open it full size. Then right-click on the image to save it to your computer. Remember that my freebies are free for your personal use only. They cannot be used for commercial purposes/resale for profit. Hope you like it. Enjoy!

post signature

17 October 2011

Ginger Citrus Simmering Spices

If you liked my Spiced Cider Simmering Spices recipe, then you might like this one too: Ginger Citrus Simmering Spices. It's easy to make and will make a great addition to your Primitive Recipes. (Note: this is not a beverage...it's like potpourri and is only meant to be enjoyed as a way to scent your home.)

Ginger Citrus Simmering Spices
These make the perfect Primitive Gifts, great as hostess gifts or just something to surprise a friend.

Ingredients
  • Dried Orange Slices
  • Ginger Root chunks
  • Cinnamon Sticks
  • Whole Cloves
  • Whole Allspice
You will also need your choice of Mason Jars and some raffia for the jar lid.

You don't need any precise measurements for this recipe. It's really just about layering each of the ingredients until you get to the top. I always start with 3-4 orange slices, then add a few pieces of ginger root, then the cinnamon sticks, cloves and allspice. I also add either a hangtag to the back, or a sticker to the bottom with directions for simmering. They can be added to a simmering potpourri pot, or to an old pot on the stovetop. Notice I don't add any fragrance oil to this recipe; it's all natural so it can't hurt the pan used for simmering. The ingredients just need to be covered with water and simmer on low--remembering to always check the water level! The smell is fabulous. Perfect for fall.

Note: I don't dry my own orange slices. I buy all my ingredients from suppliers listed on my Primitive Crafting Supplies page.

post signature

Fall Fixins

I love Prim Fixins, as so many of us do. I always have some sitting around in a bowl or a jar somewhere this time of year, especially if they are filled with all the colors of Fall. So I thought I'd just show you a little packaging idea for giving some Fall Fixins as a gift (or even to sell).

Fall Fixins
You can use any Fixins you like, of course. But in the photo I've just used rosehips, cinnamon sticks, and putka pods, scented in Pumpkin Pie scent. I've also thrown in some dried orange slices for an extra pop of color. They always look so nice in a bowl with the fixins. Of course, you could add Dough Ornies if you like to add another prim touch. Then I just put it all in a clear cello bag and tied it with some raffia. You could use the tried and true primitive standby, homespun, because that always looks cute and prim. I also always put a tag on the back with a little caution notice about the fragrance oil, since it really isn't meant to be in contact with painted or finished surfaces.

You could also put these in a jar, like I did the Primitive Putkas in a Jar. That always makes for a great presentation. No matter what you do with your fixins, they are a great touch for your  Primitive Fall decor.

post signature

22 September 2011

Grungy Primitive Pumpkin Ornie

OK, so I guess I really must have pumpkins on the brain! But hey, it's Fall, right? If it were February, then I would be worried about this old brain of mine. I decided to make this Grungy Primitive Pumpkin Ornie out of felt. 

Grungy Primitive Pumpkin Ornie

I drew a pumpkin shape and traced it onto cardstock to create my Primitive Pumpkin pattern. I used that to cut two pieces of felt into my pumpkin shape. Then I sprayed my felt shapes with Tattered Angels Glimmer Mist, in Coffee Shop color. It's a great, quick way to add a grungy effect if I don't feel like messing with my usual Grungy Sauce mixture. And it's great for small projects like this one, which is only about 3-3/4" long. You know how much I love Grungy Goods by now, so making stuff grungy is always fun for me. And it's perfectly primitive too!

After drying the felt it was time to add the face. I used buttons for the eyes, and a scrap of gingham homespun for the nose. Then I just sewed on a crooked little smile. To the back half of the pumpkin shape I sewed on a piece of cinnamon stick to be the stem. Next I started sewing the pumpkin body together, until I got 3/4 of the way done. And then I stuffed the body with fiberfill and sewed it closed.

Another cute and fun project to add to my collection of Primitive Ornies.

post signature

21 September 2011

Pumpkin Jack Dough Ornies

Amazingly, this is going to be my 100th Post! Hard to believe I've posted that much already. But hey, yay! Some people post a lot more than I do, and some a lot less. So I'm not sure if 100 posts in 10 months is really any sort of accomplishment. But it's a milestone, so I'll take it. :)

I am going to be in Primitive Fall mode until after Thanksgiving, I'm sure. That's about how I roll anymore. So I'm doing as much Fall crafting as I can (though sometimes, that's not as much as I'd really like!). This time I'm serving up some Pumpkin Jack Dough Ornies. Dough Ornies have always been a favorite of mine, so it's fun to make them for every season, don't you think?

Pumpkin Jack Dough Ornies

These Pumpkin Jacks are about 2-1/2" to 3" around. These could easily work well thrown in a bowl of Prim Fixins. They are great as actual hanging ornies too; you can even add them to the top of a gift box. I use silicone candle molds to make them (and in case you're wondering, I don't remember where I got the molds). And these are just made with my Primitive Dough Recipe. You could also paint them. Or you could save yourself some work and add powdered orange tempera paint to your dough before baking and then the pumpkin jacks will already be orange when they are baked. That's a real time saver! Then all you'd have to paint really are the features. But heck, they're primitive, so you don't have to really paint anything!


post signature