Showing posts with label Blogger Tips. Show all posts

20 March 2013

Goodbye, Google Reader

Goodbye Google Reader

I've been using Google Reader for years to stay on top of my blog reading. I follow about 150 blogs at the moment (it used to be more), and Google Reader has always been my reader of choice for keeping up with them all. It's nice to have them all in one place, and I liked the GR format so once I tried it I just kept using it.

So imagine my surprise (and annoyance) the other day when I checked into GR and there was a message saying that Google Reader would be discontinued in July! Um, come again? What the heck are you doing to me, Google? You own most of the Internet, and yet you are constantly taking away things I love. First it was Google Friend Connect...now this?! Sigh.

Anyhoots, Google provided me with a link to be able to export the blogs I follow in GR using their Google Takeout service. So I have done that. There are many reader services that will let you import that file so you don't have to lose all of your favorite blogs when GR closes this summer. But I did a little, um, Googling, and found a couple of alternatives to GR that don't require any importing (as long as you do it before GR closes). The two I'm trying out at the moment are Bloglovin and Feedly.

Bloglovin Reader

Feedly Reader

Both of these reader services are very easy to use, and both allow you to connect ans sync with your Google Reader/Blogger Account with just the click of a button (no importing of files is necessary). Feedly has more of a magazine format and takes quite a bit of getting used to, but I do like it. It has a lot of options you can adjust for how you want the blog posts displayed. Bloglovin is a little more user-friendly and simple. 

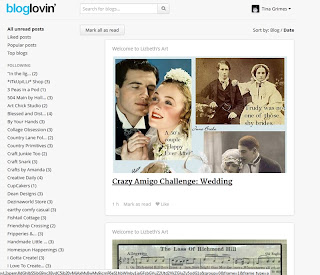
Here is a screenshot of my Bloglovin home page, so you can see how it looks:

Blogloving Home Page

And here is a screenshot of my Feedly home page, so you can compare:


So far, I'm leaning toward the Bloglovin reader because I think it's just simple, straightforward, and easy to use. It lists all the blogs I follow on the left side of the page, and I can sort them by Date or by Blog. And Bloglovin also generates Follow Buttons for you that you can place on your blog. I've already added mine to the right side of this blog (so be sure to follow me if you sign up with Bloglovin!)

Feedly is a little slicker, and has more display options, and even color themes for the layout, which is very nice. My followed blogs are grouped into my GR categories on the left side of the page (rather than individually). Both services let me connect to Facebook if I want. Both readers also have apps that you can download so you can easily follow your blogs on your mobile devices as well.

I'm going to keep using both of these reader services for now until I decide for sure which one I like best. Google Reader will be around until July, so we have time to take things for a good, long test drive. But I do suggest you start looking for your new service now, instead of waiting until the last minute. There are many other choices out there, people. I'm only listing two because these are the two I have tried. So do a little research and find the one that is best for you. :)

27 August 2012

Disqus for Blogger Comments

The Blogger comments system is a lot better than it used to be, but I never really cared much for it. I couldn't reply to comments without visiting the blog itself. I couldn't respond to specific reader comments. I hated the CAPTCHA system, but hated spam even more. So quite some time ago I switched to, in my opinion, a much better option: Disqus.

Disqus
Disqus is a comment system that works great with Blogger, and it is used by many bloggers (on Blogger and many other blog/website platforms) all over the web. I've been using it here on Tattered Sisters almost since I started the blog. I use it on my Tumblr blogs as well. It is really easy to use. It has eliminated virtually all spam comments since I started using it. I kid you not! And it allows people to comment using the Name/URL/Email option, or via Facebook or other social networks, or via their Disqus profile (if they have one)--no CAPTCHA required!

And the best part is, it is fairly easy to add to Blogger. Disqus has a gadget you use to add it to your Blogger blog, which automatically inserts all the necessary HTML and JavaScript into your blog's template. So just follow their directions to add the gadget to your blog. Disqus also has a tool which will import all your existing Blogger comments into Disqus. Note: if you don't import them they won't be lost, but they won't be visible on your blog once Disqus is active. So be sure to import them!

And if you run into any problems, Disqus has great support to help you install and get started using their comment system. I have no complaints at all since I started using Disqus. I highly recommend it to anyone! If you wan to learn more about it, just click on the image above and that will take you to the Disqus website. And did I mention, it's FREE?! Worth a peek, even if you decide not to use it (although I don't know why you wouldn't!).

03 April 2012

Subscribing to Blogs

Recently I posted about how Google Friend Connect would be disappearing from non-Blogger blogs by the end of March. And there's talk, though unconfirmed, that it will disappear from Blogger blogs too by the end of the year. I have been using that gadget to subscribe to blogs for ages, and I've used it on my own blogs, both Blogger and WordPress. Of course, the gadget has disappeared from my WordPress blogs now. And it's come to my attention that many people don't know any other way to subscribe to a blog without using GFC. So I'm writing this little tutorial on how to subscribe to blogs without using GFC. This isn't just Blogger Tips, it's good for any blog platform.

First, you need to know that you can subscribe to a blog in (at least) 4 ways:
  1. Using Google Friend Connect (if they are on Blogger and if they use it), though who knows for how long.
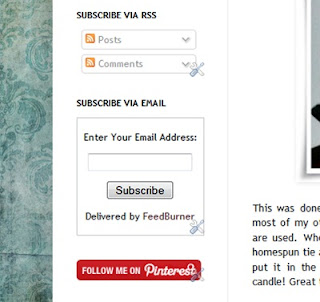
  2. Via Email. Just look for an email subscription form on the desired blog. Mine is in the left sidebar. (See photo below) Mine is provided by Feedburner, but Blogger makes a Gadget for this too! An email subscription is awesome, because it sends every new post right to your email inbox.
  3. Via Subscription Links. I have these also, directly above my email subscription form. And Blogger makes a Gadget for these too! (See photo below).
Blog Subscriptions
   
  4. Manually, in A Reader. I use Google Reader myself, so my tutorial (below) will show instructions for a manual subscription using Google Reader.

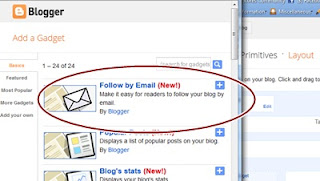
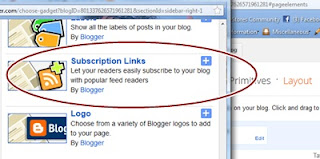
Before I show those directions, if you're on Blogger, make sure you make it easy for people to follow your blog. Blogger has 2 Gadgets to help you do this, as noted above. One is called Follow by Email. And one is called Subscription Links. So just go into your Layout and add those to your sidebar, preferably near the top of the blog, to make them easy to spot. Who knows how many potential blog followers you have lost if you don't already have these gadgets on your blog!

Subscribe via Email Gadget

Subscribe via Feed Links


Now for the tutorial on Subscribing to Blogs in Google Reader.

Step 1
Find a blog you want to subscribe to. Then go up into your browser's address bar and copy the blog's URL. (Example: BlogILove.blogspot.com).

Step 2
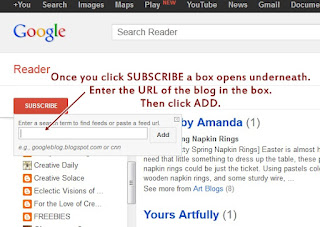
Go to Google Reader and click the Subscribe button.


Step 3
Paste the blog URL that you copied in Step 1 into the box that appears underneath the Subscribe button after you clicked on it. Then click ADD.

Subscribe in Google Reader Box

That's it! You've just subscribed to that blog. Go ahead and try it. It's super easy. And when you're finished, be sure you check your own blog to make sure you have those subscription gadgets added to your own blog, so that you make it super easy for people to follow your own blog too! And hey, spread the word. If you didn't know how to do all this, I guarantee you there are many other folks who don't know how to either. So Pay it Forward. We bloggers have to stick together, right?

09 February 2012

I Was Featured at Craft Junkie Too

I want to send a quick Thank You to Tracy over at the Craft Junkie Too blog. She just featured my post on Who's Pinning You on Pinterest over on her blog.


Craft Junkie Too Friend

So nice of Tracy to feature my blog post on her blog. You really should check out her blog too. She has tons of great stuff there, and some wonderful link parties too, which I have participated in many times. Link Parties are such a great way to find new project new ideas, or new blogs to visit...or to get traffic to your own blog. 

Anyway, thanks again, Tracy!

Goodbye Google Friend Connect

I don't know how it's possible that I didn't know this until yesterday, but Google Friend Connect is going to disappear as of March 1st. Any non-Blogger blogs will be the first to suffer since GFC will stop functioning for those blogs first. Rumor has it that GFC will also stop for all Blogger/Blogspot blogs by the end of this year...though I can't confirm this. So what does that mean for you and me?

I, myself have some self-hosted WordPress blogs where I use GFC, plus my Tattered Sisters blog here at Blogger. I have lots of followers from GFC, and I have followed hundreds of blogs myself by joining them on their GFC box on their blogs. Unfortunately, once GFC ends, that means that any blogs I have followed using GFC will no longer appear in my Google Reader for my non-Blogger blogs that I follow. So not only do I need to add those blogs to my Google Reader manually so that I don't lose them, I also need to find a way to replace Google Friend Connect on my own blogs so that folks can continue to have an easy way to follow my blogs.


Fortunately, Brent Riggs over at Linky Tools, has created a wonderful new (and free!) widget tool to allow you to continue to get followers to your blogs. I just added mine today here at Tattered Sisters. You can see it at the top of the right column of the blog. You can get your own LinkyFollowers tool by clicking on the image above to be taken to their website. And feel free to follow me using the LinkyFollowers tool on the blog!

Oh, and if you're like me and use Google Reader, and you'd like to know how to Subscribe to blogs without using Google Friend Connect, here's what you do.

Go to your Google Reader, and you should see a Subscribe button at the top that looks like this:


Click on that and a box will open where you can enter a Blog/Feed's URL. Then click Add. That will add that blog to your Reader. And be sure to look at blogs while you're on them for options to subscribe via email, or via RSS Feed. Not all bloggers add those options, but I have both of them in my left column here at Tattered Sisters, to make it easier for people to follow me in those ways. Then it's just a matter of clicking a button or two and you can subscribe to those blogs in your favorite reader (or via email). So always be on the watch for those options when you are visiting blogs!

I really liked GFC, but since it's soon to be a thing of the past, we have to start exploring our other options now!

07 February 2012

Who's Pinning You on Pinterest

Do you want to find out who is pinning your fabulous creations you've posted on your blog, your recipes, and other pin-worthy goodies on Pinterest? 

Who's Pinning You on Pinterest

If so, it's really easy. Copy the URL below into a new browser window.

http://pinterest.com/source/tatteredsisters.com/

Replace tatteredsisters.com with the URL of your blog, or website or whatever. Then hit Enter on your keyboard. You'll be taken to a Pinterest page that displays every single thing from your blog or website that has been pinned on Pinterest.

How cool is that?

Add a Pin It Button to Your Posts

If you are like me, you may have a love of all things Pinterest. I recently added a Follow Me on Pinterest button link to the left side of my blog, but I wanted to be able to add a Pin It button to each of my posts as well. I found quite a few blogs that had tutorials on how to do this, but wanted to share with you the simplest method I've found for doing so. So this tutorial will show you how to add a Pinterest Pin It button to the bottom right of each post. Note that this is just for Blogger users. Follow the steps below.

1. First you need to download one of the Pin It buttons in my Box.net box below. You can use or make your own too, of course. But I wanted to provide some options for you to start with. So grab the one you like. Upload it to your favorite photo hosting site, and get its URL. You will need it later.


2. Next you need to go into your blog's Template area to edit the blog's HTML. In my blog it says Template, then Edit HTML, but yours might say Design then under that it would say Edit HTML. It just depends on which version of Blogger (old vs new) you are using.

3. Before you go any further BACKUP your blog's Template! You never can be too safe where your blog is concerned. So whenever I am going to edit my blog's HTML, I always back it up first. There is a button or link that says Backup/Restore. Click that and choose the option to Backup Full Template. I'm just going to say that I am not responsible for any issues with your blog as a result of you using my tutorial. But you will have no worries if a problem arises if you have backed up the Template first so that you can Restore it to its previous state if need be.

4. Next you need to click that Edit HTML link. It may give you a warning window about editing the HTML, so click Proceed or OK, or whatever option provided that lets you get to the HTML.

5. Then check the option that says Expand Widget Templates.

6. Now you need to use your browser's Edit > Find menu to search your Template for the following line of code: <div class='post-footer'>

7. Once you have found the footer code, copy and paste in the code below immediately beneath it:

<div style="float: right; margin: 4px;"><a href="javascript:void((function(){var%20e=document.createElement('script');e.setAttribute('type','text/javascript');e.setAttribute('charset','UTF-8');e.setAttribute('src','http://assets.pinterest.com/js/pinmarklet.js?r='+Math.random()*99999999);document.body.appendChild(e)})());"><img alt="Pin It" class="aligncenter" src="PutYourImageURLHere" border="0" /></a></div>

Replace the text that says PutYourImageURLHere with the actual URL of the image you uploaded to your photo host in Step 1.

8. Save your Template (or Preview it first to make sure you can see the Pin It button OK, then Save).

Note: If you want to make the Pin It button appear at the bottom left side of your posts instead of the bottom right, then replace <div style="float: right; margin: 4px;"> in that line of code with just <div>.

This is the exact way that I added my own Pin It button here at Tattered Sisters. If you use WordPress.com, I haven't found a way to add the Pin It button there, since there are restrictions and limits where the Template, JavaScript, and HTML are concerned. But if you have a self-hosted WordPress.org blog, there is a Plug In you can add now that I added to my Art Chick Studio blog last night. Click Here for --> WordPress Pin It Plugin

Ok gang, Happy Pinning!