25 August 2011

Grungy Boo Bag

Now I don't tend to do a lot of Primitive Halloween crafting. I much prefer Primitive Fall crafting instead. But I was creating some other bags to post on my Art Chick Studio blog and came up with this to post here for my prim sisters. It's my Grungy Boo Bag.

Grungy Boo Bag

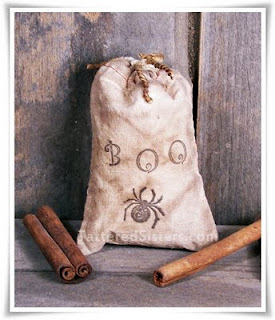
By now you know how much I love to create Grungy Goods, so any time I come up with something to add to my collection of grungy ideas, I'm a happy camper. I used my Grungy Sauce Mix recipe that I posted in my Grungy Hang Tag Tutorial to grungy up a plain muslin bag. Then I just used black ink to stamp a spider image and lettering on the bag, to spell out BOO!

These would be perfect as little treat bags; fill them with candy corn or any kind of sweet treat. They would also be great as bowl fillers or hanging off of a peg rack, or sitting on a shelf. And of course you could stamp them with all sorts of designs and saying, and you could dye the bags different colors. There are lots of possibilities!

post signature

24 August 2011

Primitive Pumpkin Bucket

Now this was just totally for fun, because I was determined to find another way to use my putka pods AND create another Primitive Fall project. The result is my little Primitive Pumpkin Bucket, accented with the cutest of Primitive Crows.
Pumpkin Bucket
I started with a plain mini black bucket, approximately 2" or so in diameter at the top. I added some fiberfill to the bottom and covered that with a piece of cardboard that I cut to fit very snug inside the bucket, just below the ridges on the bucket. I shoved in the cardboard and the ridges basically hold it in place. I did this because I knew I'd be hot gluing the putka pod "pumpkins" in, and I didn't want to have to do more than necessary. Those little suckers are small, and that takes a lot of time! So the fiberfill and cardboard barrier gave me a way to use less putkas. 

Next I took my primitive crow pick that I bought at Blossom Bucket (probably 3 or 4 years ago!) and cut the wire to the length I needed, so that the crow would sit a bit above the top of the bucket. I poked it through the cardboard and fiberfill where I wanted it to be. Then I started hot gluing in putka pods, one at a time. I just kept going until I created a nice little mound, and made it look like the crow was perched on the pumpkins.

To finish it off I just shoved in some Spanish moss here and there, to make it look like hay or something dried. And I tied a piece of jute around the bucket to help offset the black of the bucket and give it a bit of a rustic touch. I just love how this turned out.


post signature

22 August 2011

Primitive Goose and Pip Berries Tag

I decided to do another of my Primitive Hangtags today, since I'm still in creative mode. But I thought I'd do something that isn't really seasonal, and is just more primitive than anything else so it could be used for all occasions.


Now that image includes a Mason Jar (you just know I love Mason Jars!), some Pip Berries, and either a goose or a swan. I haven't quite figured out which one it is. But I'm going with goose for now. :) Hope you like this Primitive Goose and Pip Berries Tag! Click once to enlarge it, then right-click and save to your PC.


post signature

Primitive Crow and Flowers Tag

I'm still in the mood for a Primitive Fall, so today I made another Primitive Hangtag for everyone (like me!) who loves Primitive Crows and Fall. It's my Primitive Crow and Flowers Tag. Click on the image once to open it to full size, then right-click and save it to your computer.
I hope you like the hangtag!


post signature

16 August 2011

Primitive Pumpkin Pouch

OK, so I'm feeling all about the Primitive Pumpkins right now. :) I thought I'd share with you an alternative to my Primitive Putkas in a Jar that I posted about yesterday. You can put your putkas in a pouch too!

Primitive Pumpkin Pouch


You can use the same recipe to scent your little pumpkin pods, but instead of putting them in a jar, you can put them in a muslin pouch instead (after they are dry, of course, which doesn't take too long after scenting since they are so porous). To decorate your pouch, just create a cute graphic label in your favorite printing or graphics program. Print it (in reverse if you are adding text!) onto iron-on transfer paper. Then just iron it onto your muslin pouch.

These pouches of Prim Fixins are great for Primitive Gifts. And they're so easy to make, you can whip up quite a few of them in a relatively short amount of time. If you're having a Primitive Fall or Halloween-themed party, these would be perfect party favors too.


post signature

15 August 2011

Primitive Putkas in a Jar

It's the middle of August, and for me, that means it is time to start thinking about Fall, and Primitive Fall crafting! And one of my favorite things to make (and to give as Primitive Gifts) are my Primitive Putkas in a Jar.

Primitive


Now you're probably going to want the Primitive Recipe for how to scent these cute little Prim Fixins, right? It is so super easy! Here's all you need.

  • 2 Cups or so of Putka Pods (will vary depending on the size of your jar)
  • A bowl for mixing (glass is best, to make sure the fragrance oil doesn't stain or ruin the bowl!)
  • 1-2 TBSP of Fragrance Oil (I love Pumpkin Pie scent, but any Fall scent will do)
  • A Mason jar with a rusty frog lid
  • A spoon
  • A piece of plastic wrap, just big enough to cover the top of the jar
  • A strip of homespun
Now all you do is add your Putka Pods to the bowl. And before you add your fragrance oil, know this: Putkas are very porous, so they will absorb a lot of oil; AND, it doesn't take a lot of oil to scent these pumpkin-like pods--a little goes a long way, so don't overdo it! Add in a little fragrance oil and stir. You will be surprised at how little it takes to scent these pods, and the scent will last quite awhile because they're so porous. You don't want your pods to be oily and slimy though, just scented. So add a little oil at a time and stir well. Then pour them into your jar. Cover the top of the jar with the plastic wrap and then put the lid on. You can then time your homespun to the rim of the lid, or the jar neck, your choice. And that's it!

One more side note...the plastic on the top of the jar is only added if you're giving the putka jar as a gift. It'll prevent any small pods from falling out. But if you're making this for yourself, the plastic is not necessary. Just set the jar with the frog lid wherever you want it and enjoy.

ETA: I order these pods online...I've never seen them in any local craft stores. Below are some sources for these Putka Pods online.


You can also usually find them on Etsy, Ebay, and Amazon. You can also find the rusty frog lids on Ebay, Etsy, Amazon, and RustyTin.com. And if you do a Google search for Rusty Frog Lid, you'll get lots of results.

post signature

08 August 2011

Frost on the Pumpkin Bowl Filler Pattern

I found this great Primitive Pattern while surfing for primitives today. It's called Frost on the Pumpkin Bowl Fillers and it's created by Deb at Paxton Valley Folk Art.

Frost on the Pumpkin Bowl Filler Pattern
This is the perfect pattern to get your creative juices flowing for a Primitive Fall! What's better than Primitive Pumpkins! It's available for FREE download via Crafty Avenue. Just click on the link below to go to Crafty Avenue--it's an instant download.


post signature

Primitive Crow and Stars Tag

I thought it was about time to create and give away some new Primitive Freebies here on Tattered Sisters. And since I love Primitive Crows, I used that for my inspiration. So I've created a Primitive Crow and Stars Tag in two sizes and they are available for free download! Here's a sample of it.

Primitive Crow and Stars Tag


Don't download that tag though, because it has my watermark on it. Use the links below to view and download each of the free tags.


I hope you enjoy these free Primitive Hangtags!

post signature

07 August 2011

Vintage Rocking Horse and Butter Churn

These are two of my favorite vintage and Primitive Home Decor items in my dining room. My vintage-looking rocking horse and my vintage butter churn.They are wonderful Vintage Goods that I treasure in my home.

Vintage Rocking Horse and Butter Churn
Now the rocking horse isn't truly vintage; it's a reproduction that I just fell in love with because I think it looks so primitive--and so much like a folk art piece. Love it. But the butter churn is definitely vintage. The Hubs and I got it at an auction years and years ago. I've always loved it. Both of these sit on top of the hutch in my dining room. It's hard to find just the right spot for things like that since they're so big, but my hutch seemed like the perfect place for these special treasures. What are some of your vintage treasures?

post signature

01 August 2011

Primitive Cardinal Ornie

So here I am, after joking about how I am not really into sewing, and I decide to sew something. LOL I am a walking self-contradiction, to be sure. But to get technical...I really only dislike sewing with a machine. Crafty sewing is not too bad, and sometimes even fun! Anyway, I decided to make a Primitive Cardinal Ornie out of felt. Here's what I came up with.

Primitive Cardinal Ornie
I'm always one to keep things as simple as possible (especially where sewing is concerned) and this could not have been much simpler. I just came up with a pattern, cut out 2 of the cardinal's body shape and 2 of the wing shapes. I stitched the wings on to each half of the body, and then stitched both halves on the body together (with long stitches on the tail to suggest tail feathers), leaving about 1/3 of it open for stuffing. After stuffing with fiberfill, I stitched the rest of the body closed. And then I finished it by creating a knot for an eye on both sides of the head.

I love using felt for crafting, and I love how this turned out. Simple, sweet, and easy, just how I like it. It will be a nice addition to my collection of Primitive Ornies. And of course, this will work great on my Primitive Christmas tree too.

But wait. There's more! I decided to create a pattern for the cardinal, in case anyone wants it. It's already in PDF format, all ready to download, just by clicking on the link below. Keep in mind, I'm not a professional at making Primitive Patterns...but I hope you can use it and have fun with it.


You just need to cut two of each piece, stitch, stuff, and close! Super easy. You're welcome to use this pattern to make projects that you plan to sell, but please do not claim the image as your own or resell the pattern. A link back to this post on Tattered Sisters would also be greatly appreciated.

post signature

Rusty Tin Bucket Pin Cushion

Not quite sure why I have sewing on the brain lately, especially since I don't sew that much. But I created this cute little country and primitive Rusty Tin Bucket Pin Cushion the other day that I wanted to share.

Rusty Tin Bucket Pin Cushion


I just used a mini Rusty Tin bucket, along with a rusty tin star, a stem of burgundy Pip Berries, some homespun, one half of a 2" Styrofoam ball, and a circular piece of cardboard cut to the same size as the bottom of the foam ball. I also used some masking tape and hot glue.

I cut the foam ball in half and covered it with some homespun, enough to have edges I could tuck over onto the flat bottom. I taped those edges down with masking tape. Then I added another piece of homespun to the cardboard circle and taped those edges down as well. Next I hot glued the covered ball and covered cardboard together, taped edges to taped edges.

Next up I added a strip of homespun around the rusty tin bucket and then added the stem of pip berries. I topped that off with the rusty tin star, which I hot glued in place. The fabric-covered foam just sits inside the top of the rusty tin bucket. It lifts off and you can store some extra pins or other sewing notions inside.

post signature