Showing posts with label Primitive Tutorials. Show all posts

07 January 2014

Primitive Rusting Recipe

Sorry that I've been kind of absent of late. The holidays tend to take my attention to family, so I was not as active with my blogging as I normally am. I thought I'd start the new year though with a Primitive Recipe for rusting metal.

There are lots of recipes to rust metal. Some involve the use of bleach, which I prefer not to use. So the recipe I like uses simple ingredients you usually have on hand, and that aren't going to be too nasty to use. It will still smell gross, but it's a lot safer than using bleach. Although I still wear rubber gloves when I use this, just to be safe. I urge you to wear rubber gloves as well.

It's also important to note that not all metals will rust at the same rate. Iron rusts the best--but how often would we have iron items we need to rust? Just know that if you're rusting various items, they won't all look the same amount of rusty when this process is complete.

Ingredients
  • 1 16oz Bottle of Peroxide
  • 1 Cup Distilled White Vinegar
  • 1 TBSP Kosher Salt (iodized "table" salt just doesn't work right)
  • Items for rusting (safety pins, bells, nails, etc)
  • 2 Plastic Containers for the mixture--one container should have a lid
  • Old cookie sheet you won't use again (or a piece of cardboard) lined with paper towels
  • Plastic Spoon (not metal!)
  • Rubber Gloves
Directions

1. If you're using a plastic container like I do to do your mixing, poke holes in the lid. Your other container doesn't need a lid, but one of them does because it will serve as a strainer later on.

2. Add your Peroxide, Vinegar, and Salt to your container and stir. The vinegar and salt are going to be doing the rusting, by the way; the peroxide adds oxygen, which helps to speed up the oxidation process.

3. Add your metal items and stir again, then cover with the lid. Then set your container somewhere, away from pets and humans. It's going to smell, and you don't want pets or kids getting into it. It's good for it to get some direct sunlight, if possible. Leave the container set for a day. Stir your solution a few times during the day.

4. Put on your gloves again and then strain your metal items by pouring the liquid out thru the plastic lid of your container into your second plastic container. Once empty, spread your metal items onto your cookie sheet so they are in a single layer.

5. Let the metal items dry for a few hours, then turn them over to make sure they dry completely on both sides. Drying in the sun is very helpful--but do NOT put these in the oven. You don't want fumes from items to get in your metal oven. The items should get more rusty-looking as they dry.

6. Remember that not all items will rust at the same rate, nor will they all look the same. If you're unhappy with the finish you can repeat the rusting process. 

Here's an example of a variety of safety pins that I rusted:

Primitive Rusting Recipe

Now, what do you do with your leftover rusting solution? That's a good question. I've researched this a lot, on a variety of websites--from chemistry boards, to artist sites, to hobbyist-related and all sorts of sites in between. And the options I have found are varied.
  1. Dilute the solution with a large amount of water and pour down the toilet. I have done this in the past, and since my husband is a plumber, he said it was fine since the solution has been so diluted, and because we do not have any copper/metal pipes. If you're not 100% sure about your pipes, I would avoid this option.
  2. Pour into the solution a large amount of kitty litter. Once the liquid is absorbed, put it into a zip-lock bag and put in your trash.
  3. Pour into the solution enough Baking Soda to absorb the liquid; this will serve to neutralize the solution and solidify it so you can then put it in a zip-lock bag and throw it away.
  4. Seal the solution into a small container or jar and throw it away. 
Which disposal method you use is really up to you. I think you should use your best judgement or do some more research on your own. I personally also do not re-use my rusting solution. I feel that after the products are combined and their chemical reaction occurs, the solution isn't quite the same anymore. So I just do a lot of rusting at one time, and make new solution each time.

I also found another method of rusting using the same ingredients. So I'm gonna share that here. I haven't tried it, but at least it gives you another option.
  • With a spray bottle, spray items with white vinegar and allow to dry. Repeat on other sides.
  • Mix - 16oz hydrogen peroxide, 2oz white vinegar, and 1/2 Tbsp of salt in a spray bottle
  • Spray and watch the rust appear, allow to dry and then repeat for desired effect
If any of you try that particular method, please email me and let me know how it went. I think that would be great for doing a small number of items at a time. Happy rusting, everyone!

UPDATE: One of our readers (Marcia) wrote in to share some tips for rusting items that she uses with great success. Marcia suggests that you soak things in toilet bowl cleaner first, before rusting them. She says it takes the zinc coating off the items and they then rust a lot better. She also says she uses the cheapy The Works brand, lets the items soak for a few minutes, then rinses them off and dries them before putting them in the rusting solution. Marcia also uses an old toaster oven in the garage to bake her rusting items in for about 15 minutes. Thanks for your great tips, Marcia!

01 October 2013

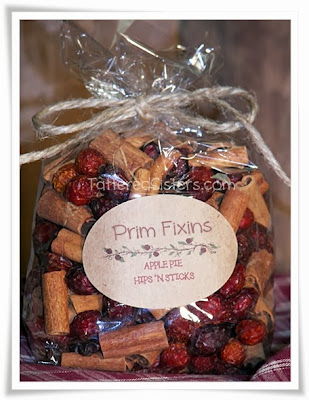
Prim Fixins Tutorial

I don't think I've ever done a Primitive Tutorial on how to make Prim Fixins. I supposed that's because they are so easy to make that I just figured a tutorial wasn't really necessary. But then I started thinking about it today and I thought maybe I should do one. The holidays will soon be upon us, after all, and Prim Fixins make a perfect gift! So I hope this will help any of you who aren't really sure how to go about scenting your rosehips, cinnamon sticks and such. This will just be for a 2-cup amount of fixins, but once you read the instructions you'll see you can adjust it and use for any quantity you might be making. And please note: all of the supplies I use can be purchased from the suppliers listed on  my Primitive Crafting Supplies page.

Primitive Fixins Tutorial

Supplies Needed
  • 2 Cups of Rosehips
  • 1/2 Ounce--or less (give or take) of Fragrance Oil of your choice.
  • A Glass Jar with lid
  • A Spoon for stirring
  • A cello bag or glass jar for your scented rosehips to go in when you're done
Instructions
  1. Add your rosehips to your jar. I always use glass because the fragrance oil can ruin many types of plastic, and I use a big jar so they have room for shaking (in step 3).
  2. Drizzle in your fragrance oil s-l-o-w-l-y, stirring as you do so. You only need just enough oil to *just* coat the rosehips. You have to know that rosehips are NOT really porous at all. They will not absorb the oil much at all during this stage. It takes time really, so if you add too much oil you're just going to have slimy, wet rosehips for a very long time, and that's not ideal. So just drizzle a little oil in and stir. If they look just barely wet that is *all* you need. Trust me.
  3. Now I tend to let my rosehips "cure" for a week or two in the glass jar with a lid. I shake them once a day to make sure all the rosehips are taking the scent. The hips may dry quite a bit during that time, or maybe not so much (depends on lots of things, and that's another reason to go easy on the oil). If you don't want to "cure" your hips, you can "bake" them in the sun for a day or two. I've never put mine in the oven (fragrance oil is usually flammable, and I don't want the scent to sort of stick around in my oven), so I don't recommend that. But I know gals who sun-bake theirs on cookie sheets (cover them with foil first!).
  4. Once your rosehips are done curing you can package them up. I add some cinnamon sticks to them and mix them up, then put them in a cello bag or glass jar.
That's pretty much it! I will add too that I have many times skipped the curing when I'm in a pinch for a quick gift to give. So I'll scent some hips and put them in a jar for gift-giving the same day. But no matter if they're cured or not, I always include a note with my fixins to let folks know that the fragrance oil is not intended for painted, plastic, or finished wood surfaces, as it can ruin the finish. Glass or glazed ceramic/stoneware is always best. Better safe than sorry, as they say.

And finally, in case you're wondering, if you want to scent Putka Pods (mini pumpkin-like pods), you can use this same process. The only differences really are that 1) Putkas are VERY porous and they absorb the fragrance oil quickly; and 2) Curing isn't really as necessary since putkas are so porous from the get-go. I just let mine sit for one day and then they're pretty well good to go. And of course putkas are perfect for the Fall. I've used a Pumpkin Cheesecake scent in the past that was just heavenly. :)

19 April 2012

How to Coffee-Dye Muslin

I recently coffee dyed some muslin for the first time. I have coffee dyed muslin bags many times using my Grungy Sauce Mix recipe that I shared in my Grungy Hang Tag Tutorial. But I had never actually coffee dyed muslin fabric, and I decided it was time to give it a go so I would have some grungy muslin on hand for craft projects. So I looked around online for various "recipes" and "how-to's" for doing this, and I ended up combining the basics of several tutorials to do my fabric. And I thought I would share that Primitive Tutorial with you.

What You Need
  • A hot pot of double-strength coffee, or enough instant coffee made to equal the same.
  • 1 TBSP Vanilla Extract
  • 1 Yard Muslin Fabric
  • 1 Cup of Soda Ash (*optional-see #1 below)
  • A Gallon of Warm Water (*optional-see #1 below)
  • Small Plastic Tub or Large Bowl (or a bucket)--something just big enough to hold the fabric covered with the coffee/water.
  • Rubber Gloves
  • A Large Spoon

Directions
  1. Now this first step is optional. But if you're wanting to help set your coffee stain to make it more permanent, this is an easy way to do it. Take your plastic tub and fill it with the water and the Soda Ash. Stir to dissolve the soda ash. Put your gloves on (soda ash can be irritating to skin). Add your fabric and soak for 20 minutes, then wring the water out of the fabric. Do NOT rinse the fabric. NOTE: Soda Ash is very inexpensive and can usually be found in craft stores wherever tie-dye supplies are sold. You can also order it online. Also note, Baking Soda is NOT the same thing. And you can skip this step all together if you want to.
  2. Empty the plastic tub and pour in your hot Coffee and Vanilla. Wear your gloves if you're worried about the hot coffee, or about getting the color on your fingers. Add the fabric into the coffee and stir it around a bit to make sure the coffee gets on all of it and get it submerged.
  3. How to Coffee Dye Muslin
  4. Soak your fabric for 10-15 minutes and then check it. Keep in mind that it will dry LIGHTER than it looks wet. If you want it darker, soak it for another 10-15 minutes. How long you soak it is really up to you. I soaked mine for about an hour or so. I know people who soak theirs overnight. If you're unsure how long to soak, do it with some swatches of test fabric first, soaking for various times. That way you can gauge how long it takes to get a color that you like, before you actually soak your full yard of fabric.
  5. Once your fabric is the desired color, remove it from the coffee bath. Mine was a bit too dark after a long soak, so I rinsed it in cold water. But rinsing is optional at this point so only rinse if you need to lighten it a bit. Again remember, the fabric will look lighter when it's dry than it does when it's wet. Wring out the fabric--wearing  your gloves (again, to avoid staining your fingers).
  6. Now you need to dry your fabric. You have three options: Air Dry, Oven Dry, or Dryer. If you choose the Oven Dry method, I would set it at no higher than 225° and lay the fabric on a cookie sheet, turning every 5 minutes (and keep an eye on it!). The oven method will add more grungy effects, which you can enhance by adding crumpled foil to your cookie sheet first. If you choose the Dryer, you may want to put the fabric inside an old pillow case first, in order to protect your dryer from the stain. If you use the Air Dry method, you can also enhance the grungy effect by using a hot iron on almost-dry fabric.
Coffee-Dyed Muslin
Air-Dried Muslin

Oven-Dried Muslin
Oven-Dried Muslin--with Wrinkles
Options
  • You can add Cinnamon (and even other spices, if you like) to your coffee dye for some added scent and color.
  • You can crumple the fabric before dying it to give it a more grungy look and add a sense of texture. You can also crumple it as it's hanging up to dry.
  • If you're making dolls or other projects, you can put your coffee dye mixture into a spray bottle and spritz some onto your project for some added grunge and texture.
  • Add some more age to your coffee dyed fabric by rubbing it with some sandpaper in spots to give it a more worn and aged appearance.
  • You can use tea instead of coffee to make your dye, but it will not usually get as dark. You can experiment with both to see which you prefer.
You can't really do this wrong because the "primitive look" isn't about perfection. It's about looking worn and aged, something you will achieve with the dye process. I hope you have fun making lots of primitive Grungy Goods with this tutorial!

12 February 2012

Primitive Sugar Cones Recipe

There are lots of Primitive Recipes around in bloggy land for making Primitive Sugar Cones. A lot of them involve cooking the sugar with water in a pot, and well, I'm just too lazy for that. So I checked out a bunch of no-cook recipes and combined some into my own new recipe that I thought I'd share.

Primitive Sugar Cone

This recipe will usually make 2 medium Sugar Cones, but it will vary depending on the size of your molds.

Ingredients
  • 3 Cups of Dark Brown Sugar*
  • 3 Cups of White Granulated Sugar
  • 1 Cup of Water (you will not use it all)
  • 3 TBSP Instant Coffee Granules
  • Non-Stick Cooking Spray
  • Mold for the Sugar
  • Aluminum Foil
First of all, some notes: You don't have to use 2 kinds of sugar; you can use all Dark Brown Sugar, all White Sugar, or even all Light Brown Sugar. But I like the look of white and dark brown sugar, so that's what I used here. For a more solid look, then just use one type of sugar. Also, you don't have to use the Instant Coffee if you don't want. You can just use plain water. The coffee just adds an extra layer of scent, and a touch of darkness here and there. But it's totally optional. And also, for the sugar mold...you can use all sorts of things if you don't have an actual sugar mold: Styrofoam cups, paper cups, a fluted beer glass, or anything in your home that has a shape you like. You could also invest in a silicone candle mold that is shaped like a sugar cone, because you can buy them!

Directions
  1. Spray your mold(s) lightly with the non-stick cooking spray.
  2. In your cup of water dissolve the Instant Coffee (if you're just using water skip this step).
  3. Add your sugar to a large a bowl and use your fingers or a fork to get all of the lumps and clumps out.
  4. Dip your fingers in the water-coffee mixture (or plain water) and sprinkle the water from your fingers into the sugar. Work the water into the sugar with your hands. Repeat this process until the sugar becomes the consistency of wet sand. If your sugar gets too wet, add a little more sugar.
  5. Pack  your sugar, a little bit at a time, into your molds. Make sure you pack it good and solid and just do a little at a time to ensure that it gets tightly packed into the molds. Once your mold is full, you can take a table knife and level it off so that it will sit flat.
  6. Invert your molds onto a flat, foil-covered surface. A cookie sheet is perfect for this. Be careful when removing the mold so that the sugar cone stays solid and doesn't crumble. Take your time! 
  7. Once the sugar cones are released from the molds, they need to sit, untouched, in a cool, dry place for 3-7 days. Time will vary according to room temperature and humidity. But once they're finished they should become quite hard.
Your finished Primitive Sugar Cones can be wrapped in grungy muslin, cheesecloth, or ribbon, or even tied up with jute or homespun. Do a bit of Googling and you can find lots of examples of other Sugar Cones that may give you some more creative inspiration for presentation.

24 July 2011

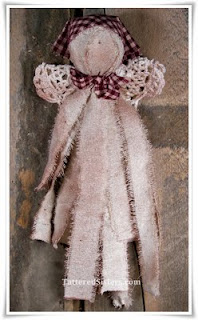
Primitive Rag Doll Angel Tutorial

I've always wanted to try making some Primitive Dolls, but I never seem to get around to it. Sewing is really not something I'm the best at, so I trick to stick more to things I'm better at. But I decided to try my hand at a primitive doll after coming across a photo and tutorial of a rag doll angel. I saved the tutorial, and I even bookmarked that site so I could link to it from here. But can I find either of those now? No. Sigh. So for now I will tell you how I did it and if/when I come across the blog again where I saw the Primitive Tutorial I will update this post with that information...because I always like to give credit where credit is due!

I didn't even use the tutorial when I created my Primitive Rag Doll Angel. I just used the image of it from my head as inspiration, because it is super easy to make. And I knew I wasn't going to make mine look exactly the same as in the tutorial. I think it came out great and I just love it!

Primitive Rag Doll Angel
Supplies Needed
  • 6-12 strips of 16-20" torn muslin, or similar fabric (there is no right or wrong on sizes for this)
  • A 5" doily (I got mine really cheap at JoAnn Fabrics
  • A 6" square of homespun, your choice of color/pattern (for the head scarf)
  • A 1/2" strip of homespun for the angel's neck
  • A 2" Styrofoam Ball (preferably smooth foam)
  • Straight Pins
  • Tattered Angels Glimmer Mist in Coffee Shop color,  or your own Grungy Sauce (you can use my recipe found in the Grungy Hang Tag Tutorial if you like)
  • Rubber Bands
  • Hot Glue
Instructions
  1. Take your foam ball, your torn strips of muslin, and your straight pins and, one at a time, drape a strip over the ball, sticking a pin in the top of the ball through each strip to hold it in place (you could use hot glue for this instead if you like, but I wanted to work faster and without the heat of the glue). Lay the next strip in the opposite direction across the ball and pin in place. Continue this process using as many strips as it takes to completely cover the ball.
  2. Take a rubber band and twist it around the strips at the base of the ball multiple times, until it's secure. This gathers the strips to create a neck and also helps hold everything in place.
  3. Fold your homespun square in half to make a triangle and drape it across the doll's head, about half way back, to create a sort of bandana/scarf look. I used just a dab of hot glue in the middle of the front of the homespun to secure it to the head.
  4. Take your 1/2" homespun strip and tie it around the neck with a bow in the front.
  5. Fold your doily in half to create wings and hot glue it to the back of the angel; do it in a few places to make sure it stays put.
  6. Then take your Glimmer Mist and just spritz it all over until the doll is as grungy as you want it to be. If you are using your own Grungy Sauce you can spritz it on instead with a spray bottle and then let it dry. I like to use a heat gun to speed up the drying process.
And that's it! Your doll is finished. You can use the homespun tied around the neck to help hang this up on the wall. Or you could use an ornament hook to make it a little easier, or some rusty craft wire. I love that I created a really simple, no-sew primitive doll, and added to my collection of Grungy Goods in the process. I love grungy stuff! And there are so many ways you could vary this doll to give it your own creative and primitive touch.

post signature

10 July 2011

Burlap Topiaries Primitive Tutorial

I just stumbled on a great Primitive Tutorial for making Burlap Topiaries. They are so neat and so easy to make I just had to share it with you!

Burlap Topiaries Primitive Tutorial


These awesome flowers are made by Tracy at The 2010's Housewife Blog. Please click on the link below to go directly to the tutorial on her blog, which has step-by-step instructions for making these.


These topiaries would make perfect Primitive Home Decor in any room of your home. I love how Tracy put hers in some vintage looking cans on a shelf. Burlap has such great texture and definitely creates a primitive feel, but you could use so many different fabrics for this project. Homespun would be great, even floral prints if you want a vintage or shabby flair! I'm definitely going to try some of these myself soon.

post signature

24 January 2011

Coffee Filter Roses Tutorial

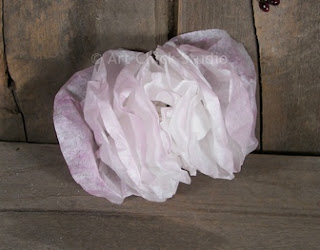
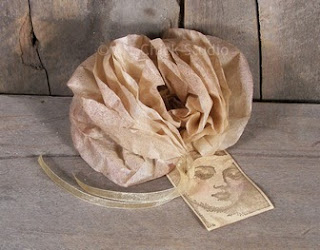
I just created a tutorial for some easy and fun Coffee Filter Roses on my Art Chick Studio blog, and I wanted to let you know about it. Since it's not necessarily a primitive craft project, (though you could add primitive touches to it) I posted it on that blog instead. But I figured I'd show you the finished examples here, and then give you the link to the tutorial in case you are interested. These are really fun to make and very inexpensive, and you can use either unbleached or bleached (white) coffee filters.

Coffee Filter Rose White

Coffee Filter Rose Vintage

I like the vintage feel of the unbleached coffee filter roses. But I also love the shabby chic look of the white roses. You could do so many different things with these. I think you're really only limited by your imagination. Follow the link below if you'd like to see the full tutorial, with lots of step-by-step photos.


post signature

13 January 2011

Primitive Snowman Globe Tutorial

Looking for a winter-themed craft project to create as decor for your home or as a gift? If so then this Primitive Snowman Globe creation is sure to please.

I found this adorable primitive snowman over on the Birchberry Farms Primitives blog.  Renee was kind enough to allow me to share the photo with you, along with a link to her wonderful primitive tutorial. To see the full tutorial, along with another photo, please follow the link below.


Be sure to leave Renee a nice comment if you like her tutorial. And tell her you found it through Tattered Sisters Primitives.


post signature

06 January 2011

Grungy Hang Tag Tutorial

I've gotten asked several times for my Grungy Sauce Mix recipe, the one that I use to create all my grungy hang tags and other grungy goods. Since I mention it on my Art Chick Studio blog as well, I get asked about it there too. So I thought I would write a Grungy Hang Tag Tutorial and share that primitive recipe here. I'm also linking this up at Tutorial Tuesday with Hope Studios.

First you'll need your Grungy Sauce Mix ingredients and supplies:
  • Instant Coffee (get the cheapest you can find...I always buy generic)
  • Vanilla or Imitation Vanilla Extract (again, go cheap if you want to; I use good vanilla for baking so I always have some on hand. But if you're not a baker just get cheap imitation vanilla!)
  • 2 Cups Hot Water (I just nuke it so it's hot enough to dissolve the coffee, but not hot enough to burn my fingers while I'm working.)
  • Ground Spices (this is totally optional and I only use it occasionally; I mostly use cinnamon)
  • A Bowl
  • A regular spoon or teaspoon
  • Plain Hang Tags

Step 1: Mix up your grungy sauce. Take the 2 cups of hot water and to that add twice as much as the directions tell you to. Mine says 1 TSP for each 8 oz cup, so I use 2 TSP for each cup. You want the grungy sauce good and dark, so really, you can add as much as you want. (My photo doesn't show all 2 cups of the mixture...just FYI.) Also add 1 TSP of vanilla, and your ground spices, if you're using them. Just a little sprinkling of spices will do.
Step 2: Dip your hang tags. Now you can do this one of two ways. 1) Dip the hang tag as it is, or, 2) crinkle and wrinkle up the tag first. Either way is fine. Wrinkling first just allows the sauce to get in all the cracks and crevices and gives it more texture and dimension. So do it however you like. Just dip them in and out of the sauce mix a few times, then let the excess liquid drip off into the bowl.


Step 3: Air Dry or Bake your hang tags. I always bake my hang tags to speed up the process, but this is not required. Baking can make the grungy effect a bit darker, which I prefer. Many people just lay them on a cookie sheet to air dry. Some people set them in the sun to bake that way. It's totally up to you. I bake mine at 200°, for just a few minutes on each side. Watch them closely. Nothing takes the fun out of this project quicker than seeing your hang tags on fire in the oven!

Once your hang tags are good and dry, you're ready to stamp them, create altered art, or whatever else you might like. The unwrinkled ones will look a little something like this:


And the wrinkled ones will look a little something like this:


I hope you find this primitive tutorial  helpful, and I hope there are lots of grungy goods in your future!


post signature

23 December 2010

Snowman Ornie Primitive Tutorial

From time to time I am going to share primitive tutorials on the blog. Sometimes they might be my own tutorials, and sometimes they will be links to tutorials that I've run across on other primitive blogs. This is the very first tutorial I'll be sharing here at Tattered Sisters. It's a Snowman Ornie Primitive Tutorial, and it appears on The Old Cupboard Door blog. Thank you to Willa for allowing me to share her photo and tutorial link with you!


If you're interested in seeing the full tutorial for these adorable primitive snowmen ornies, please click on the link below to visit Willa's blog. These are perfect little primitive ornies. I just love them!

post signature