28 February 2011

Autumn Crow Link Party Feature

Our first primitive link party, with the Primitive Crows theme, is coming to a close. So as promised, I am featuring the most visited link in the party. This link party's most visited link was the Autumn Crow, by Babette at My Spare Time Designs.

Autumn Crow

Please be sure to visit Babette's blog to view the full size image and to check out her blog! Thank you to all of the participants. I love all the primitive crow entries we had for our first primitive link party. I look forward to doing lots more, and hopefully growing the party as much as we can. I'll be posting a new link party tomorrow, and the theme will be Primitive Handmades...so you can enter any primitive handmade project! So get your thinking caps on and be sure to join the party. And please spread the word as much as you can. We want the Tattered Sisters Tuesday Challenge to get as many participants as we can.
Prim Hugs!

post signature

27 February 2011

Prim Vintage Clothespin Magnets

While in my studio last weekend I had been playing around with some vintage clothespins that I had in my laundry room. I ended up making some shabby chic style magnets out of them first, but then I decided I need to do some more primitive versions of the magnets. So I created these Prim Vintage Clothespin Magnets, which really also could be Primitive Bowl Fillers instead. You could really consider these Altered Art too, since they are vintage clothespins that I altered.

Primitive Button Clothespin Magnet
 Prim Button Clothespin

Primitive Star Clothespin Magnet
Prim Star Clothespin


For the Primitive Button Clothespin Magnet, I started by wrapping it with a strip of distressed muslin. Then I wrapped it with a smaller strip of burgundy gingham homespun fabric, and topped it with a cream-colored button.

For the Primitive Star Clothespin Magnet, I started by wrapping it with a strip of burlap. The I wrapped it with a smaller strip of mustard-colored plaid homespun, and topped it with a rusty tin star.

Then I just added a small craft magnet to the back of each clothespin to make them into primitive magnets, which again, could easily be left off if you wanted to just uses these as primitive bowl fillers instead. I am kind of a homemade magnet addict though, so these are going on my refrigerator. :o)

post signature

22 February 2011

Time Flies Primitive Hangtag

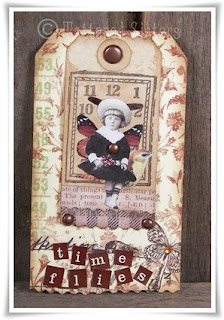
I usually post my altered art projects over at my Art Chick Studio blog. But since this one has such a primitive feel to it, I thought I'd post it here at Tattered Sisters instead. It's my Time Flies Primitive Hangtag. I'm using this as an entry into the 3 Muses Time Challenge.

Primitive Time Flies Hangtag
This hangtag is really two hangtags in one. The larger one is a 7 Gypsies tag that already comes with a background pattern/design on it. The only altering I did to it was to distress the edges with Distress Ink, and scallop the bottom with some paper edgers.

Then I created the smaller hangtag, beginning with a grungy hangtag I already had on hand. I stamped on a clock image, and I added a copper brad to serve as the hands of the clock.  I also added two different scalloped pieces of scrapbook paper to the bottom of the tag, distressing both with some ink. Then I added a vintage photo of a littler girl fairy, perched upon a little bird.She looks ready to fly, just like time.

For embellishments I added more copper brads; one to the girl's dress, to look like a button, one to the top of the hangtag, and two to the bottom corners of the smaller hangtag, which are actually holding it in place on the larger tag. Next came the brown and cream alpha stickers, spelling out Time Flies, and the last touch was a yellow rhinestone gem on the butterfly image on the larger tag.

 So this hangtag is really one part primitive, one part altered art, and one part grungy goods! And all together, I kind of like it.

post signature

Primitive Crows Link Party

I love joining link parties and blog hops and I've been doing it for awhile on my Art Chick Studio blog. Just started doing it here with Tattered Sisters too. But I decidedly recently that I would love to start hosting some of my own link parties right here on this blog. So I bit the bullet and signed up for InLinkz and now it's time to get the party started!


Tattered Sisters Tuesday

This will be the first official Tattered Sisters Tuesday Challenge link party. These challenges will be either weekly, or biweekly, just haven't decided yet, and will always be posted on Tuesday. The theme for our first party is going to be Primitive Crows. And here are the rules for participating in the link party.
  1. You must link back to the link party, either with an image link or text link in your actual blog post, or on the sidebar of your blog. You can snag the image posted above, if you like. 
  2. You must link directly to the post that your project resides in, not to your main blog page. We want your project to be easy to find, so please link directly to it. 
  3. Your project must be handmade, by you.
  4. Do not post links to online stores, products for sale on your blog, Ebay stores, or Etsy shoppes. Sorry, this isn't for getting free advertising for your business...this is for the sharing of handmade primitives with other prim sisters!
  5. It probably goes without saying, but all projects should be family friendly.
  6. Your project can be old (archived) or new (a recent post), as long as it has the appropriate theme.  
  7. Please visit at least 2 of the other blogs in the party and leave a nice comment for them. After all, that's kind of the point of the party. :o)
Would love it if you would follow Tattered Sisters as well, but I won't make that a requirement. I will feature one of the party entries next week in its own blog post, with a link back to the crafter's blog.  By joining the party you are giving your permission for me to use your product photo in a featured spot on Tattered Sisters, as applicable. Joining the party takes only a few simple steps. And you can read all of the step-by-step instructions, and the link party rules (sorry, gotta have some rules) for entering on our Tuesday Link Party page.
    Please join the party, and please spread the word about the Tattered Sisters Tuesday Challenge! It's a great way to get some traffic to your blog, and also a great way to find blogs of other talented primitive crafters!

      post signature

      21 February 2011

      Primitive Crows in a Can

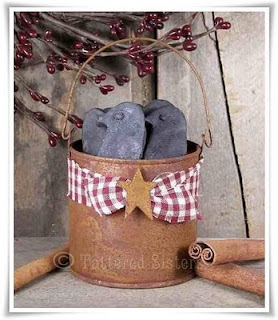
      I love primitive crows, and I also love wax melts. I also love giving wax melts as gifts. So here's a way you can give some primitive crow wax melts as gifts. Give them Primitive Crows in a Can!

      Primitive Crows in a Can
      I used a rusty tin paint can that I already had in my studio for this. It wasn't an actual paint can that got rusty though. ;) I bought it somewhere online and just thought it was so cute. I added a burgundy gingham homespun strip around the middle of the can and topped that with a rusty tin star. Let's face it, don't lots of things look more prim with a rusty tin star on them? Then I just added some scented wax melts that look like primitive crows inside the can.

      Super easy, and super cute. Any primitive crow lover would surely love these!

      post signature

      20 February 2011

      Grungy Rusty Tin Luminary

      I decided to do some recycling over the weekend, primitive style, using a tin can that I saved when I made spaghetti the other day. I knew I wanted to grungy it up and after some thinking, I decided it would make a great Grungy Rusty Tin Luminary!

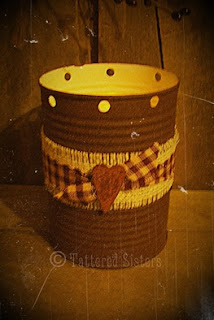
      Grungy Rusty Tin Luminary
      Now most of the time when I grungy something, I'm using melted paraffin wax and ground spices. But that can be a lot of work. So when I want a quick grungy fix, I use spray paint instead. More specifically, I use Rustoleum Multicolored Texture spray paint, which gives almost exactly the same effect, without the extra work. I bought mine at Wal Mart, but you should be able to find it at almost any hardware store.

      Rustoleum Textured Paint
      So to make my luminary, the first thing I did was wash the can well. I picked a can with a white lining, since white helps to reflect light. Also, my can opener doesn't create a sharp lip at the top of the can, but if yours does, be sure to flatten that down with a pair of pliers or something so you don't cut yourself. Once the can was clean and dry then I spray painted with my texture paint. I let the first coat dry and then repeated this two more times. 

      The next step was to create the holes around the top edge of the can. I was going to use my Crop-O-Dile for this, since it works well on light metals. But I have the tabletop version and I couldn't get the can far enough back to get the holes where I wanted. So I just used my regular paper hole punch, and it worked! I punched holes at even intervals all around the top edge of the can.

      Next, I cut a piece of burlap to wrap around the center of the can. I love the texture of burlap sometimes, and I think it stands out well against the rusty look of the can. Then I added a strip of burgundy homespun. And I finished it off with a primitive rusty tin heart.

      For the light, I used what I had on hand, which is a glass votive cup with a battery operated tealight inside. I think a battery operated votive would work better, due to the height of the can. It would put out more light that way. So I'll get one of those at some point for this can. But for now it's just the tealight...and this is how it looks lit.

      Rusty Tin Luminary Lit


      post signature

      14 February 2011

      Cinnamon Buns Dough Ornies

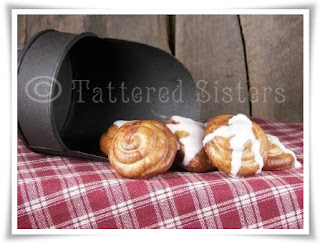
      Cinnamon Buns Dough Ornies are always my favorite ornies to make. They were very popular in my store when I sold them (my best sellers, actually) and they just look so real.

      Cinnamon Buns Dough Ornies
      To make these, I use the same Primitive Dough Recipe I've posted before. And I use 2 different methods of making the little Cinnamon Buns, depending upon how many I need to make. If I only need to make a small amount, I will hand-roll my cinnamon buns. I take a small amount of dough, around the size of a quarter or so, and I roll it out into a long "worm" shape. Then I just starting rolling it around in a circle motion until it forms a cinnamon bun.

      But if I'm going to make a whole bunch of these, I don't generally have the time, or the patience, to hand-roll that many cinnamon buns. So when that's the case, I use a silicone mold. It makes the whole process go much more quickly and makes it seem less like a chore when there is a large quantity involved.

      To finish these, I seal them in cinnamon bun scented wax, which I melt in my Presto Pot. I just stick a needled in the bottom center of the dough ornie, dip it in the wax, let it drip for a few seconds and then place it on waxed paper to cool. Now these can be iced or left plain, but to me, they look best iced. And I make quick work of that process by purchasing ready-made wax "icing" from Rose's Candles. I just drizzle it over my finished cinnamon buns.

      These are great primitive bowl fillers. I always have some sitting somewhere in my house. And of course, they are perfect to give as gifts too. You can make a bunch of small ones, or even really large ones and give those individually. Just remind the recipients that they aren't edible...because they really do look real!

      post signature

      09 February 2011

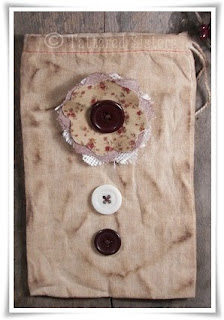
      Grungy Button Bag

      Over the weekend I created another project with a grungy theme, my Grungy Button Bag. I always have a good studio day when I'm making more Grungy Goods!

      Grungy Button Bag
      This bag is about 5x7" in size. I grungy'd it up first using my grungy sauce mix, following the recipe on my Grungy Hang Tag Tutorial. Then the next step was to create the 3-layered flower out of 3 different types of material. This was the very first time I made a fabric flower, so I followed a Burlap Flower Tutorial that I had linked to on my art blog. I did everything the same except the very end, because I wanted the center of my flower to be more flat, so that I could attach the button in the center. I tried to vary the materials I used for the flower. I chose a cream colored burlap for the back layer; a plain muslin for the middle layer, but I also grungy'd that up with some Glimmer Mist in "coffee shop" color; and then the top layer is a vintage-looking cotton print.

      After I sewed the flower to the bag, I added to more buttons in brown and cream colors to balance it out and finish it off. It just didn't seem finished with only the flower on there. I like it much better with the two additional buttons. I think I'm going to use this creation as a gift bag for someone. It's very primitive looking, but you know, you could leave the bag white and go shabby chic if you wanted to as well. It has lots of possibilities.


      post signature

      07 February 2011

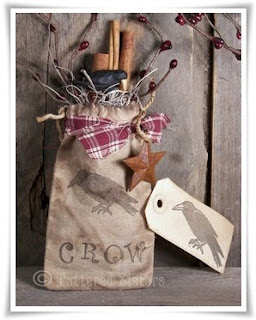
      Grungy Crow Bag

      I was in a grungy mood over the weekend and decided to do something with crows too. The result is my Grungy Crow Bag.

      Grungy Crow Bag
      I started with a grungy muslin bag, which I have on hand most of the time since I love working with grungy bags. But if you need the recipe for making things grungy, you can find it in my Grungy Hang Tag Tutorial. Next I stamped on a crow image and the word CROW using black ink. To the grungy bag I added some stems of burgundy pip berries, some 6" cinnamon sticks, and some drieds (Spanish Moss). I also found a resin black crow craft pick in my studio, so I added that too, and I added a primitive rusty tin star as an accent too. I finished this off with a burgundy homespun tie, and I created a matching grungy crow hang tag as well.


      post signature

      05 February 2011

      Grungy Primitive Tapers

      Getting things grungy is a fun way to add a rustic and primitive touch to your home. Of course, I'm rather addicted to Grungy Goods too. I'll grungy up almost anything! One thing I always have on hand is taper candles, and I always have fun grungying up those and making them look like primitive candles.


      I grungy these up the same way I do any of my wooden items. I simply melt my paraffin wax in my Presto Pot. Then I add my fragrance oil--Cinnamon Buns is almost always my scent of choice. Then what I do is take a long craft needle and poke it into the candle so I don't have to hold it with my fingers (hot wax on my fingers is not my idea of fun, LOL). I dip it and roll it around in the wax, then quickly roll it around in my ground spices. I will usually use a mixture if ground cinnamon, ground nutmeg and ground cloves, or some combination of those. Once it's set for a bit, then I'll take my needle and dip on side in the wax to seal, then flip it over and do the other side. I find that if I try to seal the whole thing at once, I lose too many spices. So I just do one side at a time and that works best for me. 

      These look great in a country or primitive sconce or in a tabletop taper holder. But you can also have some fun with these, especially if you're wanting to give them away as gifts. Here's an idea for you...

      You just need a grungy muslin bag, your grungy'd primitive candles, a bit of homespun fabric, some pip berry stems, and some drieds (I use Spanish moss). I also use a stencil that says Simplify, with brown or black stencil cream. I stencil the grungy bag first. Then I put the candles in and tuck in some of the drieds and the pip berry stems. Next I tie a short length of homespun around the top of the bag to hold the tapers, pip berries, and drieds in place. And that's it! This can sit on a shelf, or even hang from a peg rack, and again, it does make a great gift.


      post signature

      02 February 2011

      Primitive Annies Bowl Fillers

      I'm always looking for new things to do with muslin bags. They are so affordable, and so easy to use in various primitive craft projects. Most of the time I like to grungy them up for that real primitive look, but sometimes I will leave them plain and see what I can do with them. Here's one idea that I think is really cute that features graphics that look like primitive dolls.

      Primitive Annie Bowl Fillers

      These are just plain white muslin bags that measure 3-1/4" x 5" in size. To add the graphics, I just found some that I liked in my vast collection, and then I printed them onto iron-on transfer inkjet paper, which you can find at any office supply store. Then I ironed them onto the bags, and finished them off by stuffing them with fiberfill. The only thing you have to remember when using iron-on transfer paper is that if whatever you are printing includes text, you need to choose the option to reverse the design before you print. Otherwise, your text will print backwards. ;)

      I have used these as primitive bowl fillers, mixed with some pip berry accents and old buttons. You could also throw in other handmade fabric ornies, or dough ornies. But they can also be perfect on any  little country or prim shelf decor you have in your home. And you can use absolutely any graphics you have to print on these and change them out from season to season. They would also make really cute gifts.


      post signature