Showing posts with label Primitive Recipes. Show all posts

09 October 2015

Favorite Fall Primitives

Hey, all. I thought since I haven't posted in awhile I would put together a post to highlight a collection of my favorite Primitive Fall projects from the past. This will be a way to share projects with my longtime readers, and new readers, that I have really loved creating since I started the Tattered Sisters blog. And hopefully it will get you inspired to make some new Fall projects, since Fall is finally upon us!

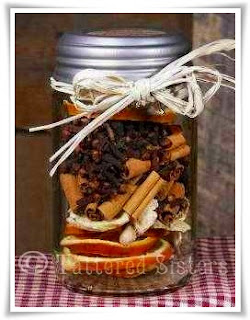
So let's begin with one of my favorite creations, and one of my most read posts on the blog. And that is, for my Ginger Citrus Simmering Spices.

Ginger Citrus Simmering Spices

If you've made these, you know already how wonderfully delicious they smell, and how they really make your home smell like Fall! If you haven't made them yet, what are you waiting for? And if you need the recipe, just click on the image and it will take you to the blog post where you can find it.

Next up are my grungy Boo Bags. 


Boo Bags

These were so easy and fun to make. You know I LOVE Grungy Goods anyway! But these were great because I made them as little treat bags just for Fall or Halloween. If you'd like to make some too, just click on the image and it will take you to the Boo Bags post.

Let's also remember the Primitive Putkas in a Jar that I made. I love finding new ways to use Mason Jars, especially for gift-giving. So when Fall is at hand, these are a really quick, easy, and very fun gift to give your primitive friends, especially if they like scented items.

Prim Fixins Putkas in a Mason Jar

Just scent your putkas, put them in a rusty frog jar lid, add some homespun, and it's a gift! A really good smelling gift too.

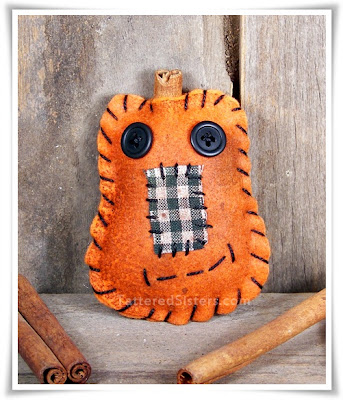
Here's another fun craft I made awhile back, my Grungy Primitive Pumpkin Ornie.

Primitive Pumpkin Fall Ornie

Any of you who have read my blog for awhile know that sewing is NOT my favorite thing. But on occasion, I do like to make ornies, because they're just cute and they require minimal sewing. I loved making this little guy, and I see his face show up in my Pinterest feed a lot, so I know other folks like him too. :)

Oh, I also loved making this Primitive Pumpkin Jack Dough Ornies.


And their mini Pumpkin Jack Dough ornies friends. 

Mini Pumpkin Jack Ornies

I love dough ornies! They are so fun, and pretty easy to make too. And they make great gifts. I make all my Dough Ornies with the same basic recipe, which you can find here:


And let's not forget, this Pumpkin Muslin Bag was a super easy Fall primitive craft.

Pumpkin Muslin Bag

They are also perfect little treat bags for Halloween. Click on the image to view the full blog post on how I made them. And you know, you could make a pumpkin face stencil to make the faces on these bags and use rubber stamp ink or paint to make a whole bunch of these bags in relatively short order. You could even get the kiddos to help!

And one last item as I travel down my Primitive Fall memory lane, this was one of my favorite primitive freebies that I created to share with you.  My Fall Pumpkin Tags.

Fall Pumpkin Tags

That pumpkin tag freebie is still available for FREE download. Just lick on the tag image and it will take you to the PDF file that you can download and print, in case you missed that original post. 

I hope you enjoyed this little treasury of my favorite Fall Primitives. Which one was your favorite? I also hope you have an absolutely fabulous Fall this year as well!

Happy Fall, Y'all!

07 January 2014

Primitive Rusting Recipe

Sorry that I've been kind of absent of late. The holidays tend to take my attention to family, so I was not as active with my blogging as I normally am. I thought I'd start the new year though with a Primitive Recipe for rusting metal.

There are lots of recipes to rust metal. Some involve the use of bleach, which I prefer not to use. So the recipe I like uses simple ingredients you usually have on hand, and that aren't going to be too nasty to use. It will still smell gross, but it's a lot safer than using bleach. Although I still wear rubber gloves when I use this, just to be safe. I urge you to wear rubber gloves as well.

It's also important to note that not all metals will rust at the same rate. Iron rusts the best--but how often would we have iron items we need to rust? Just know that if you're rusting various items, they won't all look the same amount of rusty when this process is complete.

Ingredients
  • 1 16oz Bottle of Peroxide
  • 1 Cup Distilled White Vinegar
  • 1 TBSP Kosher Salt (iodized "table" salt just doesn't work right)
  • Items for rusting (safety pins, bells, nails, etc)
  • 2 Plastic Containers for the mixture--one container should have a lid
  • Old cookie sheet you won't use again (or a piece of cardboard) lined with paper towels
  • Plastic Spoon (not metal!)
  • Rubber Gloves
Directions

1. If you're using a plastic container like I do to do your mixing, poke holes in the lid. Your other container doesn't need a lid, but one of them does because it will serve as a strainer later on.

2. Add your Peroxide, Vinegar, and Salt to your container and stir. The vinegar and salt are going to be doing the rusting, by the way; the peroxide adds oxygen, which helps to speed up the oxidation process.

3. Add your metal items and stir again, then cover with the lid. Then set your container somewhere, away from pets and humans. It's going to smell, and you don't want pets or kids getting into it. It's good for it to get some direct sunlight, if possible. Leave the container set for a day. Stir your solution a few times during the day.

4. Put on your gloves again and then strain your metal items by pouring the liquid out thru the plastic lid of your container into your second plastic container. Once empty, spread your metal items onto your cookie sheet so they are in a single layer.

5. Let the metal items dry for a few hours, then turn them over to make sure they dry completely on both sides. Drying in the sun is very helpful--but do NOT put these in the oven. You don't want fumes from items to get in your metal oven. The items should get more rusty-looking as they dry.

6. Remember that not all items will rust at the same rate, nor will they all look the same. If you're unhappy with the finish you can repeat the rusting process. 

Here's an example of a variety of safety pins that I rusted:

Primitive Rusting Recipe

Now, what do you do with your leftover rusting solution? That's a good question. I've researched this a lot, on a variety of websites--from chemistry boards, to artist sites, to hobbyist-related and all sorts of sites in between. And the options I have found are varied.
  1. Dilute the solution with a large amount of water and pour down the toilet. I have done this in the past, and since my husband is a plumber, he said it was fine since the solution has been so diluted, and because we do not have any copper/metal pipes. If you're not 100% sure about your pipes, I would avoid this option.
  2. Pour into the solution a large amount of kitty litter. Once the liquid is absorbed, put it into a zip-lock bag and put in your trash.
  3. Pour into the solution enough Baking Soda to absorb the liquid; this will serve to neutralize the solution and solidify it so you can then put it in a zip-lock bag and throw it away.
  4. Seal the solution into a small container or jar and throw it away. 
Which disposal method you use is really up to you. I think you should use your best judgement or do some more research on your own. I personally also do not re-use my rusting solution. I feel that after the products are combined and their chemical reaction occurs, the solution isn't quite the same anymore. So I just do a lot of rusting at one time, and make new solution each time.

I also found another method of rusting using the same ingredients. So I'm gonna share that here. I haven't tried it, but at least it gives you another option.
  • With a spray bottle, spray items with white vinegar and allow to dry. Repeat on other sides.
  • Mix - 16oz hydrogen peroxide, 2oz white vinegar, and 1/2 Tbsp of salt in a spray bottle
  • Spray and watch the rust appear, allow to dry and then repeat for desired effect
If any of you try that particular method, please email me and let me know how it went. I think that would be great for doing a small number of items at a time. Happy rusting, everyone!

UPDATE: One of our readers (Marcia) wrote in to share some tips for rusting items that she uses with great success. Marcia suggests that you soak things in toilet bowl cleaner first, before rusting them. She says it takes the zinc coating off the items and they then rust a lot better. She also says she uses the cheapy The Works brand, lets the items soak for a few minutes, then rinses them off and dries them before putting them in the rusting solution. Marcia also uses an old toaster oven in the garage to bake her rusting items in for about 15 minutes. Thanks for your great tips, Marcia!

25 November 2013

Grungy Sauce Recipe

Hey, gang. I'm re-posting my Grungy Sauce Recipe because for some reason, people have trouble finding it on the blog. Even though it's in the Primitive Recipes category, some folks can't seem to find it. I think it's because it is posted in my Grungy Hang Tag Tutorial. So I want to make it easier to find and just post that recipe all by itself. Not sure why I didn't do this a long time ago! :)

Grungy Sauce Mix Ingredients:
  • Instant Coffee (get the cheapest you can find...I always buy generic)
  • Vanilla or Imitation Vanilla Extract (again, go cheap if you want to; I use good vanilla for baking so I always have some on hand. But if you're not a baker just get cheap imitation vanilla!)
  • 2 Cups Hot Water (I just nuke it so it's hot enough to dissolve the coffee, but not hot enough to burn my fingers while I'm working.)
  • Ground Spices (this is totally optional and I only use it occasionally; I mostly use cinnamon)
  • A Bowl
  • A regular spoon or teaspoon
 
Grungy Sauce Mix Recipe

Mix up your grungy sauce. Take the 2 cups of hot water and to that the instant coffee--twice as much as the directions tell you to. Mine says 1 TSP for each 8 oz cup, so I use 2 TSP for each cup. You want the grungy sauce good and dark, so really, you can add as much as you want--so add more if you want to! Also add 1 TSP of vanilla, and your ground spices, if you're using them. Just a little sprinkling of spices will do.

Once it is mixed up, you can use it right away, or you can let it cool off first. If you're going to be dipping things into it, I'd suggest letting it cool first so you don't burn your fingers! I store my sauce in an old jar in the refrigerator. Occasionally, I also put some in a spray bottle and keep that in the frig too. The spray bottle is great for when you just want to spritz some grungy sauce onto a finished project; whereas the sauce you have in a jar you can pour into a bowl and use for dipping things, like hang tags or what not.

There are many variations to this recipe out there. Some people use tea instead of coffee. I think I tried that a few times, but I prefer the instant coffee because it's just easier. You can't really screw this up, so don't worry in that regard. Have fun with it.

Now go forth and get grungy!

12 October 2012

Cinnamon Salt Dough Recipe

I love making Dough Ornies, but I wanted to try a new recipe, so I thought I'd try a Cinnamon Salt Dough Recipe. This Primitive Recipe is pretty common, and has lots of variations. I think it's a very flexible recipe that you can't really mess up. I used my own variation to create these Primitive Fall dough ornies to use as Primitive Bowl Fillers.

Fall Acorns Dough Ornies Bowl Fillers

Fall Leaves Primitive Dough Ornies

The Recipe
  • 2 Cups Flour
  • 1 Cup Salt
  • 1/4 Cup Cinnamon*
  • 1-1/2 Cups Water
Mix all the ingredients together and work into a dough. You can add a little extra water if the dough is too dry, or a little extra flour if the dough is too wet. Knead the dough several times. Then you roll it out onto a surface dusted with cinnamon, and to your desired thickness (at least 1/4"). Cut out with cookie cutters of your choice. Bake at 300° for 45-60 minutes, making sure to check them during the last stage of baking so that they don't overcook or burn! The thicker they are, the more baking time they're likely to need. Let them cool completely before you handle them.

After mine were finished I used some diluted craft acrylic paints to kind of give my ornies a wash of color. For the acorns I just did the top half of the ornies so they would look more like acorns. For the leaves I painted the entire shape, using various colors to look like fall leaves. You don't have to dilute the paint if you don't want though, it's up to you. I just didn't want a very dark color on my ornies.

These can be sealed with melted, scented wax, as I do with most of my dough ornies. Or, you could purchase a spray to seal. Krylon makes a clear acrylic spray paint, and they also make a "triple thick clear glaze" you could use.

*A note about the cinnamon: I used a small portion of cinnamon so that my ornies didn't get too dark. If you are planning to make ornies that you DO want to be darker, like for gingerbread men, for example, you can use an entire cup of cinnamon. The more cinnamon you use, the darker the ornies will be. I knew I was going to paint some of mine so I didn't want them too dark. Do yourself a favor though and get your cinnamon at the dollar store, if you have one nearby. It will much more affordable!

19 April 2012

How to Coffee-Dye Muslin

I recently coffee dyed some muslin for the first time. I have coffee dyed muslin bags many times using my Grungy Sauce Mix recipe that I shared in my Grungy Hang Tag Tutorial. But I had never actually coffee dyed muslin fabric, and I decided it was time to give it a go so I would have some grungy muslin on hand for craft projects. So I looked around online for various "recipes" and "how-to's" for doing this, and I ended up combining the basics of several tutorials to do my fabric. And I thought I would share that Primitive Tutorial with you.

What You Need
  • A hot pot of double-strength coffee, or enough instant coffee made to equal the same.
  • 1 TBSP Vanilla Extract
  • 1 Yard Muslin Fabric
  • 1 Cup of Soda Ash (*optional-see #1 below)
  • A Gallon of Warm Water (*optional-see #1 below)
  • Small Plastic Tub or Large Bowl (or a bucket)--something just big enough to hold the fabric covered with the coffee/water.
  • Rubber Gloves
  • A Large Spoon

Directions
  1. Now this first step is optional. But if you're wanting to help set your coffee stain to make it more permanent, this is an easy way to do it. Take your plastic tub and fill it with the water and the Soda Ash. Stir to dissolve the soda ash. Put your gloves on (soda ash can be irritating to skin). Add your fabric and soak for 20 minutes, then wring the water out of the fabric. Do NOT rinse the fabric. NOTE: Soda Ash is very inexpensive and can usually be found in craft stores wherever tie-dye supplies are sold. You can also order it online. Also note, Baking Soda is NOT the same thing. And you can skip this step all together if you want to.
  2. Empty the plastic tub and pour in your hot Coffee and Vanilla. Wear your gloves if you're worried about the hot coffee, or about getting the color on your fingers. Add the fabric into the coffee and stir it around a bit to make sure the coffee gets on all of it and get it submerged.
  3. How to Coffee Dye Muslin
  4. Soak your fabric for 10-15 minutes and then check it. Keep in mind that it will dry LIGHTER than it looks wet. If you want it darker, soak it for another 10-15 minutes. How long you soak it is really up to you. I soaked mine for about an hour or so. I know people who soak theirs overnight. If you're unsure how long to soak, do it with some swatches of test fabric first, soaking for various times. That way you can gauge how long it takes to get a color that you like, before you actually soak your full yard of fabric.
  5. Once your fabric is the desired color, remove it from the coffee bath. Mine was a bit too dark after a long soak, so I rinsed it in cold water. But rinsing is optional at this point so only rinse if you need to lighten it a bit. Again remember, the fabric will look lighter when it's dry than it does when it's wet. Wring out the fabric--wearing  your gloves (again, to avoid staining your fingers).
  6. Now you need to dry your fabric. You have three options: Air Dry, Oven Dry, or Dryer. If you choose the Oven Dry method, I would set it at no higher than 225° and lay the fabric on a cookie sheet, turning every 5 minutes (and keep an eye on it!). The oven method will add more grungy effects, which you can enhance by adding crumpled foil to your cookie sheet first. If you choose the Dryer, you may want to put the fabric inside an old pillow case first, in order to protect your dryer from the stain. If you use the Air Dry method, you can also enhance the grungy effect by using a hot iron on almost-dry fabric.
Coffee-Dyed Muslin
Air-Dried Muslin

Oven-Dried Muslin
Oven-Dried Muslin--with Wrinkles
Options
  • You can add Cinnamon (and even other spices, if you like) to your coffee dye for some added scent and color.
  • You can crumple the fabric before dying it to give it a more grungy look and add a sense of texture. You can also crumple it as it's hanging up to dry.
  • If you're making dolls or other projects, you can put your coffee dye mixture into a spray bottle and spritz some onto your project for some added grunge and texture.
  • Add some more age to your coffee dyed fabric by rubbing it with some sandpaper in spots to give it a more worn and aged appearance.
  • You can use tea instead of coffee to make your dye, but it will not usually get as dark. You can experiment with both to see which you prefer.
You can't really do this wrong because the "primitive look" isn't about perfection. It's about looking worn and aged, something you will achieve with the dye process. I hope you have fun making lots of primitive Grungy Goods with this tutorial!

12 February 2012

Primitive Sugar Cones Recipe

There are lots of Primitive Recipes around in bloggy land for making Primitive Sugar Cones. A lot of them involve cooking the sugar with water in a pot, and well, I'm just too lazy for that. So I checked out a bunch of no-cook recipes and combined some into my own new recipe that I thought I'd share.

Primitive Sugar Cone

This recipe will usually make 2 medium Sugar Cones, but it will vary depending on the size of your molds.

Ingredients
  • 3 Cups of Dark Brown Sugar*
  • 3 Cups of White Granulated Sugar
  • 1 Cup of Water (you will not use it all)
  • 3 TBSP Instant Coffee Granules
  • Non-Stick Cooking Spray
  • Mold for the Sugar
  • Aluminum Foil
First of all, some notes: You don't have to use 2 kinds of sugar; you can use all Dark Brown Sugar, all White Sugar, or even all Light Brown Sugar. But I like the look of white and dark brown sugar, so that's what I used here. For a more solid look, then just use one type of sugar. Also, you don't have to use the Instant Coffee if you don't want. You can just use plain water. The coffee just adds an extra layer of scent, and a touch of darkness here and there. But it's totally optional. And also, for the sugar mold...you can use all sorts of things if you don't have an actual sugar mold: Styrofoam cups, paper cups, a fluted beer glass, or anything in your home that has a shape you like. You could also invest in a silicone candle mold that is shaped like a sugar cone, because you can buy them!

Directions
  1. Spray your mold(s) lightly with the non-stick cooking spray.
  2. In your cup of water dissolve the Instant Coffee (if you're just using water skip this step).
  3. Add your sugar to a large a bowl and use your fingers or a fork to get all of the lumps and clumps out.
  4. Dip your fingers in the water-coffee mixture (or plain water) and sprinkle the water from your fingers into the sugar. Work the water into the sugar with your hands. Repeat this process until the sugar becomes the consistency of wet sand. If your sugar gets too wet, add a little more sugar.
  5. Pack  your sugar, a little bit at a time, into your molds. Make sure you pack it good and solid and just do a little at a time to ensure that it gets tightly packed into the molds. Once your mold is full, you can take a table knife and level it off so that it will sit flat.
  6. Invert your molds onto a flat, foil-covered surface. A cookie sheet is perfect for this. Be careful when removing the mold so that the sugar cone stays solid and doesn't crumble. Take your time! 
  7. Once the sugar cones are released from the molds, they need to sit, untouched, in a cool, dry place for 3-7 days. Time will vary according to room temperature and humidity. But once they're finished they should become quite hard.
Your finished Primitive Sugar Cones can be wrapped in grungy muslin, cheesecloth, or ribbon, or even tied up with jute or homespun. Do a bit of Googling and you can find lots of examples of other Sugar Cones that may give you some more creative inspiration for presentation.

12 January 2012

Primitive Bath Tea

I wanted to share another Primitive Bath and Body gift you can make. Had planned to post more of these before Christmas but got rather sidetracked with all the holiday hubbub. So I apologize for that. But this is an easy bath item to make and perfect for Primitive Gifts for any time of year. It's my Primitive Bath Tea.

Primitive Bath Tea

So here is what you need for this Primitive Recipe:
  • Kraft Tin Tie Bags
  • Large Heat Sealable teabags 4 x 5.5"
  • Dried Rose Petals
  • Dried Lavender
  • Dried Chamomile
  • Labels and Jute (or homespun) for the bag
First let me say that all of my resources for these supplies are now listed on my Primitive Crafting Supplies page. And there is no set amount of each dried ingredient for this Bath Tea. I just mix equal parts of each, enough to fit in the teabag. Then I seal the bag with a hot iron, which only takes a couple of seconds. I generally put 3 or 4 in the Kraft Tin Tie bag, however many will fit (just depends on how fat I've made the teabags). Then I punch two holes in the top of the closed Kraft bag and tie some jute or homespun through it and add a label on the front. I also put a smaller label on the back. I put the ingredients on there--and this is a MUST if you plan to sell them because it's Federal Law to list the ingredients in order of quantity, from highest to lowest. And I'll add directions, which is basically just to add one or two bags to hot bath water and let "steep" for several minutes before getting in.

You can vary your ingredients according to your liking, but these are just my favorites to use. And of course you could be very creative with the labels if you like, or even the packaging. Have fun with it!

post signature

30 November 2011

Milk Bath Recipes

With the holidays upon us, I thought I would share some Primitive Recipes in December for country and Primitive Bath and Body products you might like to make yourself and give as gifts. It's still November as I type this, but I'll try to add a couple more recipes next month.

Milk Bath in a Milk Bottle


I'm starting with a Milk Bath recipe. I made a few different types of  Milk Baths when I had my retail store and online store too. You can easily Google "milk bath recipe" and get lots of ideas. But the three I'm listing below will give you a place to start. And my photos show you  a couple of ways that I packaged my Milk Bath powder.

Milk Bath Plastic

Milk Bath with Oatmeal
  • 1 Cup Corn Starch
  • 2 Cups nonfat Dry Milk powder
  • 1/2 Cup Baking Soda
  • 1/2 Cup finely ground Oatmeal
Process the Oatmeal in a blender or food processor. And Milk powder and mix. Pour into a bowl and add the remaining ingredients, and mix well. This makes about 4 cups of Milk Bath.

Buttermilk Milk Bath
  • 1/2 Cup nonfat Dry Milk powder
  • 1/2 Cup Dry Buttermilk
  • 1 Cup fine Sea Salt
  • 2 TBSP Cornstarch
Combine all the ingredients in a bowl until they are well blended. This makes about 2 Cups of Milk Bath. Note of caution: dry buttermilk can be stinky! This is not meant to a fragrant bath--it's designed for skin-softening only. You could always increase the dry milk and decrease the buttermilk if you find the buttermilk's odor too overpowering.

3 Ingredient Milk Bath
  • 2 Cups nonfat Dry Milk powder
  • 1 Cup Sea Salt (or Epsom Salt)
  • 1/4 TSP of Skin-Safe Fragrance
Mix the milk powder and the salt, then add the fragrance and mix until well combined.

Directions for use of Milk Baths: Use 3 TBSP or more to bath water to smooth and soften your skin.


post signature

17 October 2011

Ginger Citrus Simmering Spices

If you liked my Spiced Cider Simmering Spices recipe, then you might like this one too: Ginger Citrus Simmering Spices. It's easy to make and will make a great addition to your Primitive Recipes. (Note: this is not a beverage...it's like potpourri and is only meant to be enjoyed as a way to scent your home.)

Ginger Citrus Simmering Spices
These make the perfect Primitive Gifts, great as hostess gifts or just something to surprise a friend.

Ingredients
  • Dried Orange Slices
  • Ginger Root chunks
  • Cinnamon Sticks
  • Whole Cloves
  • Whole Allspice
You will also need your choice of Mason Jars and some raffia for the jar lid.

You don't need any precise measurements for this recipe. It's really just about layering each of the ingredients until you get to the top. I always start with 3-4 orange slices, then add a few pieces of ginger root, then the cinnamon sticks, cloves and allspice. I also add either a hangtag to the back, or a sticker to the bottom with directions for simmering. They can be added to a simmering potpourri pot, or to an old pot on the stovetop. Notice I don't add any fragrance oil to this recipe; it's all natural so it can't hurt the pan used for simmering. The ingredients just need to be covered with water and simmer on low--remembering to always check the water level! The smell is fabulous. Perfect for fall.

Note: I don't dry my own orange slices. I buy all my ingredients from suppliers listed on my Primitive Crafting Supplies page.

post signature

07 September 2011

Spiced Cider Simmering Spices

Now that cooler temperatures are trying to sneak in, I can really start thinking about Fall, and Fall scents for my home. One of my favorite things about Fall and winter is scenting my home with my favorite scents. In the Fall, I especially love the smell of Spiced cider. It's one of my favorites. So here is a quick and easy Primitive Recipe for my Spiced Cider Simmering Spices. (Note: this is not a beverage...it's like potpourri and is only meant to be enjoyed as a way to scent your home.)


Now this recipe is simple because there aren't precise amounts of anything. You can use whatever amounts you'd like of each ingredient, based on your preference, and the total amount you're trying to make. And you can add your own additional ingredients if you'd like, or leave out things you may not like. It's totally up to you. But here's what I use.
  • Dried Apple Slices
  • Bay Leaves
  • Whole Cloves
  • Star Anise
  • Cinnamon Sticks (small chunks or large, your choice)
  • Crushed Corn Cob (this is used to help absorb the fragrance oil since some ingredients are less porous than others--so it will help maintain the scent)
  • Fragrance Oil, Spiced Cider scent
I just mix these ingredients in the amounts I want to fit in whatever pan or simmering potpourri pot I'll be simmering them in. I add the ingredients to a glass bowl and then drizzle in a couple teaspoons of the fragrance oil and stir it up well. Always do a little oil at a time, especially if you're only making a small amount of simmering spices. You don't want to add too much. Then I put it all in a glass jar for a few days to cure.

When you're ready to simmer, just add the simmering spices to your pot or pan with some water and simmer away. You can totally simmer these spices on the stovetop if you don't have a potpourri pot--but be sure to use an old pan. Any time you use fragrance oil you want to use an old pan, because the oil could ruin it. Also be sure to check your water level regularly so that it doesn't evaporate away. I always use just enough water to cover the spices. 

These Prim Fixins are just the perfect way to make your home smell like Primitive Fall has arrived! You can also make batches of this and package them up to give as gifts, or to sell too. They'd make great hostess gifts at a Fall party.

post signature

15 August 2011

Primitive Putkas in a Jar

It's the middle of August, and for me, that means it is time to start thinking about Fall, and Primitive Fall crafting! And one of my favorite things to make (and to give as Primitive Gifts) are my Primitive Putkas in a Jar.

Primitive


Now you're probably going to want the Primitive Recipe for how to scent these cute little Prim Fixins, right? It is so super easy! Here's all you need.

  • 2 Cups or so of Putka Pods (will vary depending on the size of your jar)
  • A bowl for mixing (glass is best, to make sure the fragrance oil doesn't stain or ruin the bowl!)
  • 1-2 TBSP of Fragrance Oil (I love Pumpkin Pie scent, but any Fall scent will do)
  • A Mason jar with a rusty frog lid
  • A spoon
  • A piece of plastic wrap, just big enough to cover the top of the jar
  • A strip of homespun
Now all you do is add your Putka Pods to the bowl. And before you add your fragrance oil, know this: Putkas are very porous, so they will absorb a lot of oil; AND, it doesn't take a lot of oil to scent these pumpkin-like pods--a little goes a long way, so don't overdo it! Add in a little fragrance oil and stir. You will be surprised at how little it takes to scent these pods, and the scent will last quite awhile because they're so porous. You don't want your pods to be oily and slimy though, just scented. So add a little oil at a time and stir well. Then pour them into your jar. Cover the top of the jar with the plastic wrap and then put the lid on. You can then time your homespun to the rim of the lid, or the jar neck, your choice. And that's it!

One more side note...the plastic on the top of the jar is only added if you're giving the putka jar as a gift. It'll prevent any small pods from falling out. But if you're making this for yourself, the plastic is not necessary. Just set the jar with the frog lid wherever you want it and enjoy.

ETA: I order these pods online...I've never seen them in any local craft stores. Below are some sources for these Putka Pods online.


You can also usually find them on Etsy, Ebay, and Amazon. You can also find the rusty frog lids on Ebay, Etsy, Amazon, and RustyTin.com. And if you do a Google search for Rusty Frog Lid, you'll get lots of results.

post signature

09 May 2011

Country Primitive Sachet Recipe

When I had my online store I used to make and sell a LOT of  Prim Fixins, including sachets. They are super easy to make and very affordable, and they were always one of my best sellers. So I thought I'd share the how-to primitive recipe with you, in case you'd like to make some too.

Primitive Sachet

Supplies
  • Crushed Corn Cob
  • Fragrance Oil
  • Glass Jar with a Lid
  • Muslin Bags (plain, or grungy them up first)
Let me start by saying that you have 2 options for buying the Crushed Corn Cob. 1) You can go online to a candle supply store and pay a fortune for it, or, 2) You can go into the pet supply section of the nearest Wal-Mart or other department store and buy it there super cheap. Personally, I always do the latter! They sell crushed corn cob as pet bedding for small animals, like hamsters and gerbils and such. But it's the same exact stuff that you can buy online at every candle supply store--only difference is you will pay them far more than you will if you just visit Wally World. So save yourself a LOT of money and get it cheap. Then follow the directions below.
  1. Put 2 cups of your crushed corn cob into the glass jar (I always use glass jars, because fragrance oil can damage many types of plastic).
  2. Add 1 ounce of your favorite fragrance oil--or a little more (you can adjust this to your liking).
  3. Cover the jar with the lid and shake well to mix. 
  4. Shake the jar off and on for 2-3 days to let the corn cob absorb as much of the oil as possible.
  5. Add crushed corn cob to your muslin bag and enjoy!
A word of caution: fragrance oil can damage finished wood and painted surfaces, so I always put a caution label on the bag so people will know that, as sometimes the corn cob is still moist and a bit of oil can damage those surfaces if it makes contact through the bag.

And as a helpful tip--the muslin bags can be made much more primitive-looking just by grungying them up first. You can use rubber stamps or even stencils to embellish the bags with some sort of text or images. But you can also do what I have done often (as shown in photo above) and create iron-on transfer labels for your sachets and just iron them on. I usually use PrintMaster to create labels, using iron-on transfer paper made for ink jet printers, and making sure to print my transfer in reverse (don't forget that!).

I use very small muslin bags for my sachets and they hold about 2 ounces of corn cob. So the 2 cups I mix up can make quite a few bags. These are great to put in drawers or closets, or even to hang in cars to keep things smelling good. They are also great as party favors because you can customize and personalize them for any occasion!


post signature

22 March 2011

Primitive Refresher Oil Recipe

As I promised when I posted my Primitive Room Spray Recipe, I want to share with you my recipe for Primitive Refresher Oil.

Primitive Refresher Oil
Now I'll tell you right off the bat that many people bottle up straight fragrance oil as their refresher oil, and you can definitely do that if you like. But for me, with the cost of fragrance oils what they are, that's just not a very economical way to go (especially if you're selling your refresher oil!). So I always use a refresher oil base with fragrance oil added to it. The standard ratio is usually:


Desired Ounces Refresher Oil + 2% Fragrance


But that was a bit too much thinking for me when I first started making refresher oils, so I figured out some more accurate measurements and this is what I use all the time.


5 Ounces Refresher Oil Base (RusticEscentuals.com)
1 Ounce Fragrance Oil


This will make 6 - 1 ounce bottles, because I always use 1 ounce Boston amber round bottles for my refresher oils, with glass droppers. If you want to make just a single 1 ounce bottle, that's a bit trickier, and I gave up trying to figure it out. ;) So I just kind of guestimated and used 1 ounce of the base with 5-7 drops of fragrance oil. Some oils are stronger than others, so you can play with it a bit. It doesn't have to be exact.

I'll tell you some sources I use for my bottles, but with one caveat: always take into consideration the total cost of the bottles including shipping when determining the best price of any bottles your purchase. Shipping varies greatly from one supplier to another, one state to another. So even though one store might have the actual bottles for a cheaper price, it can come out to be more expensive once shipping is figured in. You have to shop around to get the best deal, and the "best deal" is going to vary for everyone. That being said, I get my bottles from either SunburstBottle.com or SpecialtyBottle.com.

You can use the refresher oil to freshen up your Prim Fixins and even corn cob sachets, which I also used to sell. I'll probably post a recipe/tutorial for those at some point also.I sure you enjoy this and all of my Primitive Recipes!

post signature

15 March 2011

Primitive Room Spray Recipe

I used to sell Primitive Room Spray on my website, Pip Berry Place. There are lots of different recipes for  primitive room sprays, but I thought I'd share with you the primitive room spray recipe that I used to make mine. This recipe is easy, but uses ingredients you  need to purchase from various online sources. You can do a Google search for "room spray base" or "air freshener spray base" and you should get good results for where to purchase it. But I will note my sources below. There are also lots of recipes you can find on Google if you just enter "primitive room spray" as your search terms. Many of the recipes often are made from ingredients you have on hand at home. But I preferred the purchased ingredients.


Ingredients

8 oz Room Spray Base  (RusticEscentuals.com)
1 TSP Fragrance Oil      (Bittercreek.com)

Add 8oz of the room spray base to your desired bottle. Add in the fragrance oil. Shake well.

I always included a note on my label, which stated that this spray was not intended for use on skin, finished wood, or painted surfaces. It is designed as a room spray only. But I did have many customers who would use it to refresh the scented rosehips in their prim fixins, which is totally fine. It's just not meant to be sprayed on furniture, the body, etc.


post signature

07 January 2011

Primitive Dough Recipe

Since I make a lot of dough ornies and primitive pantry cakes, I thought I would share my Primitive Dough Recipe with you. I've seen lots of dough recipes over the years, and there are lots of similar ones, and lots of different ones too. This one is the result of lots of variations and experimentation. These are the types of things you can make with this recipe...though you are only limited by your imagination!


Ingredients
  • 3/4 Cup of Shortening
  • 3/4 Cup of Sugar
  • 1/4 Cup of Brown Sugar
  • 1/2 Cup of Molasses
  • 3 Cups of Flour
  • 1 TBSP Cinnamon
  • 1/2 TSP Salt
  • 1/2 Cup to 1 Cup of Water (more or less)
Directions
  1. Cream together the Shortening and the Sugars in a large mixing bowl until mixed well.
  2. Stir in the Molasses, again until mixed well.
  3. In separate bowl, combine the Flour, Cinnamon, and Salt and stir to combine.
  4. Begin to alternately add your dry ingredients to the wet mixture. Add the flour mixture and 1/4 cup of the water at a time until ingredients are mixed and you have formed a good dough. At some point, it's best to just get your hands in there and start mixing, as it will quickly become a challenge to stir with a spoon! You may need to add a little more water or flour to get your dough to the correct consistency. You want to be able to touch the dough with your finger and have it not stick to it. So when that happens, it's ready.
  5. Shape your dough into a large ball. Cover it with plastic wrap and set in the refrigerator for 20-30 minutes.
If you plan to be using your dough for cut-out ornies (using cookie cutters, etc), what I like to do is sprinkle my counter with cinnamon. This helps the dough to not stick, but it also adds extra cinnamon to the outer layer of the dough, which I like. But this is totally optional. I also suggest you buy your cinnamon in large bulk containers; it's much cheaper that way...and get the cheapest cinnamon you can find. No sense spending a lot of money on something you aren't going to eat!

For cut-outs and small ornies (like the cinnamon bun ornies), bake these at 350° for for 15-20 minutes. It may be more or less, depending on your own oven. They will harden quite a bit while cooling. Just be sure they're cooked through and let them cool completely.

For larger items like pantry cakes or very large cinnamon buns (I've done full size ones on occasion), I usually bake them at 325° for 20-30 minutes, again, oven times will vary, and the thickness of your item will be a big factor too.

And if you're going to dip your ornies or other baked dough items in wax, just make sure they are cooled completely before doing so.


post signature

06 January 2011

Grungy Hang Tag Tutorial

I've gotten asked several times for my Grungy Sauce Mix recipe, the one that I use to create all my grungy hang tags and other grungy goods. Since I mention it on my Art Chick Studio blog as well, I get asked about it there too. So I thought I would write a Grungy Hang Tag Tutorial and share that primitive recipe here. I'm also linking this up at Tutorial Tuesday with Hope Studios.

First you'll need your Grungy Sauce Mix ingredients and supplies:
  • Instant Coffee (get the cheapest you can find...I always buy generic)
  • Vanilla or Imitation Vanilla Extract (again, go cheap if you want to; I use good vanilla for baking so I always have some on hand. But if you're not a baker just get cheap imitation vanilla!)
  • 2 Cups Hot Water (I just nuke it so it's hot enough to dissolve the coffee, but not hot enough to burn my fingers while I'm working.)
  • Ground Spices (this is totally optional and I only use it occasionally; I mostly use cinnamon)
  • A Bowl
  • A regular spoon or teaspoon
  • Plain Hang Tags

Step 1: Mix up your grungy sauce. Take the 2 cups of hot water and to that add twice as much as the directions tell you to. Mine says 1 TSP for each 8 oz cup, so I use 2 TSP for each cup. You want the grungy sauce good and dark, so really, you can add as much as you want. (My photo doesn't show all 2 cups of the mixture...just FYI.) Also add 1 TSP of vanilla, and your ground spices, if you're using them. Just a little sprinkling of spices will do.
Step 2: Dip your hang tags. Now you can do this one of two ways. 1) Dip the hang tag as it is, or, 2) crinkle and wrinkle up the tag first. Either way is fine. Wrinkling first just allows the sauce to get in all the cracks and crevices and gives it more texture and dimension. So do it however you like. Just dip them in and out of the sauce mix a few times, then let the excess liquid drip off into the bowl.


Step 3: Air Dry or Bake your hang tags. I always bake my hang tags to speed up the process, but this is not required. Baking can make the grungy effect a bit darker, which I prefer. Many people just lay them on a cookie sheet to air dry. Some people set them in the sun to bake that way. It's totally up to you. I bake mine at 200°, for just a few minutes on each side. Watch them closely. Nothing takes the fun out of this project quicker than seeing your hang tags on fire in the oven!

Once your hang tags are good and dry, you're ready to stamp them, create altered art, or whatever else you might like. The unwrinkled ones will look a little something like this:


And the wrinkled ones will look a little something like this:


I hope you find this primitive tutorial  helpful, and I hope there are lots of grungy goods in your future!


post signature