28 March 2011

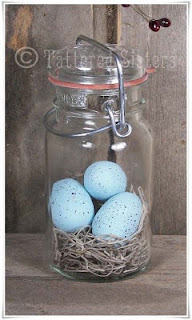
Primitive Robin Eggs Jar

I don't decorate for many holidays anymore, not since my daughter got married. I tend to only do Christmas and Autumn decorating. But lately I've been wanting to add more Primitive Spring-themed Primitive Home Decor. So as I'm crafting I'm constantly thinking of what can I make to put in the living room or kitchen and what-not. I've been inspired by lots of bloggers who post crafts and home decor with robin eggs, so this led me to create my Primitive Robin Eggs Jar.

Primitive Robin Eggs Jar

You could use any old vintage jar you might have around to create something like this. I didn't have any truly vintage jars that had a big enough opening, so I chose a jar I had in my studio. It's got a very old-fashioned and vintage look to it, so I figured it would work just fine. Then I took some plain wooden eggs, about 1-3/4" long, and painted them a nice robin's egg blue. Next I used a toothbrush to spatter some brown speckles onto the eggs. After they were all dry I added some Spanish Moss to the bottom of my jar and then put the eggs on top. It's sort of like a prim nest in a jar. I love it. And of course it could be for Primitive Easter decor too.

post signature

27 March 2011

Primitive Grungy Bunny Bag

I've pretty much been in spring crafting mode lately. And now Easter is on its way too, so it got me thinking about rabbits, naturally. So I decided I needed to craft something bunny-related. And the result is my Primitive Grungy Bunny Bag.

Prim Grungy Bunny Bag

This little bag is made out of a 5x7 muslin drawstring bag. I spritzed the bag first with some of my Glimmer Mist (Coffee Shop color) to give it the grungy effect in a quick and easy way. Then I lightly drew on the features for the bunny's face with pencil. Next I painted the face with regular craft acrylics. Obviously a bunny  needs ears so I cut two ear shapes from another muslin bag, and grungy'd them up too. I created folds in the bottom of each ear shape to give them more dimension. Then I punched a small hole through the folds to be able to insert a craft brad through them. I cut a very small slit in the side of the bunny bag near the top, just under where the draw string opening is. Then I took a craft brad and put it through the holes in the bottom of one ear, and then through the side of the bunny bag near the top where I'd made my slit. The prongs of the brad are on the inside of the bag and they hold the ear in place. Then I just repeated this on the other side for the other ear. And then I just stuffed the bag with some fiberfill and tied it closed.

Now I only put fiberfill into the bag so that I could get a good picture of the bunny face. This is really meant to be a gift bag. You could easily fill a bag like this with little chocolate eggs or Jelly Beans or something and give it as a gift. Or you could just stuff it like I did and use it as decor for your Primitive Easter. Totally up to you. But totally cute either way!


post signature

22 March 2011

Primitive Refresher Oil Recipe

As I promised when I posted my Primitive Room Spray Recipe, I want to share with you my recipe for Primitive Refresher Oil.

Primitive Refresher Oil
Now I'll tell you right off the bat that many people bottle up straight fragrance oil as their refresher oil, and you can definitely do that if you like. But for me, with the cost of fragrance oils what they are, that's just not a very economical way to go (especially if you're selling your refresher oil!). So I always use a refresher oil base with fragrance oil added to it. The standard ratio is usually:


Desired Ounces Refresher Oil + 2% Fragrance


But that was a bit too much thinking for me when I first started making refresher oils, so I figured out some more accurate measurements and this is what I use all the time.


5 Ounces Refresher Oil Base (RusticEscentuals.com)
1 Ounce Fragrance Oil


This will make 6 - 1 ounce bottles, because I always use 1 ounce Boston amber round bottles for my refresher oils, with glass droppers. If you want to make just a single 1 ounce bottle, that's a bit trickier, and I gave up trying to figure it out. ;) So I just kind of guestimated and used 1 ounce of the base with 5-7 drops of fragrance oil. Some oils are stronger than others, so you can play with it a bit. It doesn't have to be exact.

I'll tell you some sources I use for my bottles, but with one caveat: always take into consideration the total cost of the bottles including shipping when determining the best price of any bottles your purchase. Shipping varies greatly from one supplier to another, one state to another. So even though one store might have the actual bottles for a cheaper price, it can come out to be more expensive once shipping is figured in. You have to shop around to get the best deal, and the "best deal" is going to vary for everyone. That being said, I get my bottles from either SunburstBottle.com or SpecialtyBottle.com.

You can use the refresher oil to freshen up your Prim Fixins and even corn cob sachets, which I also used to sell. I'll probably post a recipe/tutorial for those at some point also.I sure you enjoy this and all of my Primitive Recipes!

post signature

Spring Primitives Link Party

I took a week off from our Tattered Sisters Tuesday Challenge primitive link party last week. Just had too much going on. Sometimes I'll need to take a break, but I do enjoy hosting these so I hope you'll continue to participate. This week's link party theme is Spring Primitives. You can post anything that is primitive and spring in its theme. Maybe you want to post some primitive spring home decor, or a primitive spring craft project you've created recently (or in the past--it doesn't have to be new). As long as it's primitive AND spring related, we'd love for you to join the party! Also, keep in mind, we will be having an Easter themed link party in April, so if you have Easter goodies to share, you might want to save them for that link party instead of this one. But you can certainly post Easter items here if you like!


Tattered Sisters Tuesday

Please remember to follow our Tuesday Link Party rules. I really don't like when I have to delete entries because the rules weren't followed. The main rule (though there are others) is that you can't post something that's for sale. This is not a venue for free business advertising. We are just here to share our love of all things primitive. And be sure to link back to the party in your blog post or sidebar. You can grab our button by copying the HTML code in the box above and pasting it where you want it to display. But also please try to visit at least one or two of the other entries and leave comments on their blog, where applicable. One of the main goals of the link party is to send traffic to the blogs of the participants, so please stop by and pay some of them a visit. Now let's get this party started, shall we?

post signature


19 March 2011

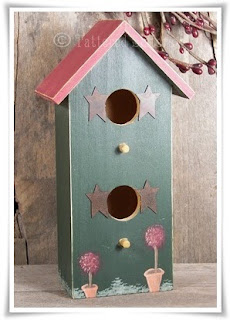
Primitive Spring Birdhouse

One of the first things that comes to mind when I think of the season of spring is birds. I love when I start to see birds outside again this time of year. I think they must be more excited about it than people are who are itching with spring fever! So with birds and spring in mind, I created this country primitive spring birdhouse. 

Primitive Spring Birdhouse

I bought a plain wooden birdhouse from a craft store and sanded it smooth so it would accept paint well. Then I painted the main part of the birdhouse a nice, deep, woodsy green color. And I painted the roof a complimentary burgundy color. Then I took sandpaper and distressed the edges of the wood just a bit, to give it a bit more of a primitive look. Next, I got a bit creative and painted on a topiary on either side of the front of the birdhouse; I also painted on some greenery to look like grass and such at the bottom. Just wanted a little touch of color and whimsy there. And then I finished it off by gluing on some rusty tin stars around each opening in the front, to look like little primitive shutters.

This birdhouse is meant for indoor use, but if I were going to put it outside, I'd probably seal with some clear acrylic spray. I use that for sealing lots of art projects and crafts. It's available wherever spray paint is in your local hardware stores. But since this sits inside the house, no real need for it to be sealed. Love how it turned out though.

post signature

18 March 2011

Primitive St. Patrick's Day Link Party Feature

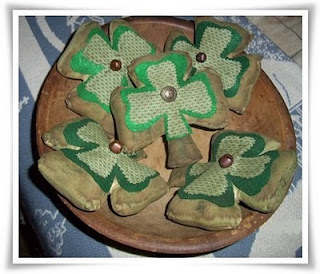
Time to announce our featured entry for the St. Patrick's Day link party. Our most visited link in the party was the Prim Shamrocks, created by a wonderful crafter and sweet lady named Connie. 

Prim Shamrocks
Connie doesn't have a blog, but she loves to craft and she loves primitives. So I encouraged her to share her beautiful creations with us, and she's been actively participating in our link parties. And I'm so glad she has! Congratulations to Connie!! We didn't get as many participants for this link party as I'd hoped...but we're still young link party hosts, so we need time to grow. Our next link party will have a Primitive Spring theme, and that will start on Tuesday. So I hope to see lots more participants in that party. I really enjoy looking at everyone's prims...so the more to look at, the better.

post signature

15 March 2011

Primitive Room Spray Recipe

I used to sell Primitive Room Spray on my website, Pip Berry Place. There are lots of different recipes for  primitive room sprays, but I thought I'd share with you the primitive room spray recipe that I used to make mine. This recipe is easy, but uses ingredients you  need to purchase from various online sources. You can do a Google search for "room spray base" or "air freshener spray base" and you should get good results for where to purchase it. But I will note my sources below. There are also lots of recipes you can find on Google if you just enter "primitive room spray" as your search terms. Many of the recipes often are made from ingredients you have on hand at home. But I preferred the purchased ingredients.


Ingredients

8 oz Room Spray Base  (RusticEscentuals.com)
1 TSP Fragrance Oil      (Bittercreek.com)

Add 8oz of the room spray base to your desired bottle. Add in the fragrance oil. Shake well.

I always included a note on my label, which stated that this spray was not intended for use on skin, finished wood, or painted surfaces. It is designed as a room spray only. But I did have many customers who would use it to refresh the scented rosehips in their prim fixins, which is totally fine. It's just not meant to be sprayed on furniture, the body, etc.


post signature

12 March 2011

Primitive Grungy Wooden Eggs

With spring just around the corner, it's only natural to start creating craft projects with a spring-theme. Flowers, birds, bunnies, eggs...all wonderful sings of my favorite season. So the first spring project I'll share with you here at Tattered Sisters is my Primitive Grungy Wooden Eggs.


I made these the same way I make most of my Grungy Goods. I start with some plain wooden eggs, about 1-1/2" long and my basic grungy tools and ingredients: Presto Pot for melting wax, paraffin wax, Cinnamon Bun scented fragrance oil, metal tongs, and ground cinnamon. 

I start by  melting the wax, and then I add the fragrance oil. Then I roll an egg into the melted wax to coat and then quickly roll it through my ground cinnamon and set it aside. I do all my eggs like this before moving to the sealing stage. Once all the eggs have been dipped and rolled in cinnamon, I then use the tongs to dip half of each egg quickly in the wax and let it drip dry, then I repeat on the other side. Dunking the whole coated egg in the wax can cause too much cinnamon to come off, in my experience. So I find that doing one half at a time is best. Then I just repeat this process until I finish all my eggs. 

These really are great for your primitive spring decor. Here are some ideas for how to use them:
  • Put some in a craft nest.
  • Add some dried Spanish moss to the bottom of a mason jar and put some eggs on top. 
  • Use them as primitive bowl fillers alone, or with your favorite prim fixins.
  • Add some around a candle in a rusty candle pan.


post signature

08 March 2011

Primitive St. Patrick's Day Link Party

Time for a brand new Primitive Link Party here at Tattered Sisters. With St. Patrick's Day upon us next week, I figured it's the perfect theme for this Tuesday challenge. Please link up any primitive project you have that has a St. Patrick's Day theme. And if you don't happen to have something exactly fitting with St. Patrick's Day, then post something green instead! 

Tattered Sisters Tuesday

You can find all of our rules and instructions on the Tuesday Link Party page, so be sure to visit that. I have to delete links that don't follow the rules and I don't like to do that! Note that while this challenge is primarily for bloggers, to share creative ideas, spread some comment love, and get some traffic to your blog, you can still participate if you don't have a blog. Just upload your project photo to a photo hosting site (like Photo Bucket). And where it says URL in the link party tool area, just enter the URL of your project photo. And remember, please don't link to items you have for sale. This links party is for sharing creative ideas only; it's not meant to be a means to get free advertising for your business or products. And try to visit at least 2 of the blogs with entries in the party and share some nice comments. Grab our link party button to post on your blog and be sure to spread the word. The party gets better when more people join in the fun!

post signature


07 March 2011

Primitive Handmades Link Party Feature

Time to spotlight and feature our most visited link from last week's Tattered Sisters Tuesday Challenge primitive link party. And that honor goes to Rachel at the Somewhere in the Middle blog. Rachel created this wonderfully primitive Grungy Soap Dispenser.

Grungy Soap Dispenser

Congratulations to Rachel! Be sure to visit her blog and check out her other wonderful creations.  And thank you to all of our wonderful participants in the link party. We had some great projects to view and share. There is so much talent and creativity out there, and I love see it all in our link parties!


post signature

06 March 2011

Primitive Crow n Shamrock Hanger

I've got something to crow about for sure today...it's my Primitive Crow n Shamrock Hanger that I just finished, just in time for St. Patrick's Day!

I made the crow itself out of felt. I really like the look and feel of felt in craft projects, so I'm always happy to use it in something new. I drew a crow shape on cardstock to create a pattern, then traced that twice on the felt and then cut them out. Then I also drew a wing shape and cut out four of those. For the raggedy shamrock I used some green and cream ticking fabric--I drew the shamrock and then cut out two of those. 

I used black embroidery thread to stitch the wings together first, using a top stitch. I left about a 1" opening to  stuff with fiberfill, then stitched each wing closed. Then I attached each wing to one side of the crow's body. Next I stitched the crow together, again using black embroidery thread and a simple top stitch, and leaving a couple of inches open for stuffing. Once the crow was sewn together I added some  green primitive star buttons for eyes. And then I used some yellow acrylic paint to paint his beak. I just thought the all black beak was too much and I wanted a pop of color. 

Then I stitched most of the raggedy shamrock together on my sewing machine, leaving a small opening for stuffing, then sewed it closed. I trimmed off the excess fabric and rubbed the fabric a bit to get it to be more raggedy-looking. Then I finished it off by attaching the raggedy shamrock to the crow with black embroidery thread, and I attached another piece of the thread to the crow's body so I can hang it up. 

I don't do tons of sewing craft projects because I'm just not that good at it. But I do love how my primitive crow turned out. And he'll be perfect hanging in my kitchen.

post signature

01 March 2011

Prim Peter Cottontail Giveaway

Dawn over at Aunt Dee Dee's Designs is having a wonderful giveaway for this adorable primitive Peter Cottontail doll. It's just so cute, I had to share the giveaway with all of you.

Peter
You have until March 7th to enter the giveaway. Just visit the link I posted above and become a follower and leave a comment for your entry. Good luck, everyone!

post signature

Primitive Handmades Link Party

Time for a new Primitive Link Party. This week's Tattered Sisters Tuesday Challenge theme is simply Primitive Handmades. You can link up any primitive handmade project that you've created. You can find all the rules and instructions for entering on the Tuesday Link Party page. And please note that while these challenges are designed for bloggers (so you can get traffic to your blog, and find wonderful new primitive blogs to follow), you don't have to have a blog to participate. You can link up to any photo you have hosted online somewhere. Just use the URL of the photo where it says URL in the link up area.


Tattered Sisters Tuesday


Remember that you must  link back to this link party either in your blog post or in the sidebar. You can use the party button image above, or use a text link, either way is fine. Make sure the URL you provide links directly to the specific blog post, not to the main page of your blog. And remember that you can't link to Etsy Shoppes, Ebay or other types of online stores or products for sale. This link party is solely for sharing our primitive creations and ideas with each other, rather than for advertising your business. And be sure to visit at least 2 of the other blogs and leave a nice comment for them!


post signature