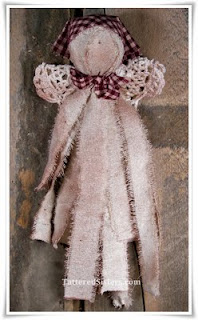
I've always wanted to try making some Primitive Dolls, but I never seem to get around to it. Sewing is really not something I'm the best at, so I trick to stick more to things I'm better at. But I decided to try my hand at a primitive doll after coming across a photo and tutorial of a rag doll angel. I saved the tutorial, and I even bookmarked that site so I could link to it from here. But can I find either of those now? No. Sigh. So for now I will tell you how I did it and if/when I come across the blog again where I saw the Primitive Tutorial I will update this post with that information...because I always like to give credit where credit is due!
I didn't even use the tutorial when I created my Primitive Rag Doll Angel. I just used the image of it from my head as inspiration, because it is super easy to make. And I knew I wasn't going to make mine look exactly the same as in the tutorial. I think it came out great and I just love it!
- 6-12 strips of 16-20" torn muslin, or similar fabric (there is no right or wrong on sizes for this)
- A 5" doily (I got mine really cheap at JoAnn Fabrics
- A 6" square of homespun, your choice of color/pattern (for the head scarf)
- A 1/2" strip of homespun for the angel's neck
- A 2" Styrofoam Ball (preferably smooth foam)
- Straight Pins
- Tattered Angels Glimmer Mist in Coffee Shop color, or your own Grungy Sauce (you can use my recipe found in the Grungy Hang Tag Tutorial if you like)
- Rubber Bands
- Hot Glue
- Take your foam ball, your torn strips of muslin, and your straight pins and, one at a time, drape a strip over the ball, sticking a pin in the top of the ball through each strip to hold it in place (you could use hot glue for this instead if you like, but I wanted to work faster and without the heat of the glue). Lay the next strip in the opposite direction across the ball and pin in place. Continue this process using as many strips as it takes to completely cover the ball.
- Take a rubber band and twist it around the strips at the base of the ball multiple times, until it's secure. This gathers the strips to create a neck and also helps hold everything in place.
- Fold your homespun square in half to make a triangle and drape it across the doll's head, about half way back, to create a sort of bandana/scarf look. I used just a dab of hot glue in the middle of the front of the homespun to secure it to the head.
- Take your 1/2" homespun strip and tie it around the neck with a bow in the front.
- Fold your doily in half to create wings and hot glue it to the back of the angel; do it in a few places to make sure it stays put.
- Then take your Glimmer Mist and just spritz it all over until the doll is as grungy as you want it to be. If you are using your own Grungy Sauce you can spritz it on instead with a spray bottle and then let it dry. I like to use a heat gun to speed up the drying process.
And that's it! Your doll is finished. You can use the homespun tied around the neck to help hang this up on the wall. Or you could use an ornament hook to make it a little easier, or some rusty craft wire. I love that I created a really simple, no-sew primitive doll, and added to my collection of Grungy Goods in the process. I love grungy stuff! And there are so many ways you could vary this doll to give it your own creative and primitive touch.


No comments:
Post a Comment
Prim Hugs and Thanks for Your Comments!
Note: Only a member of this blog may post a comment.