25 July 2011

Primitive Mason Jar Sewing Kit

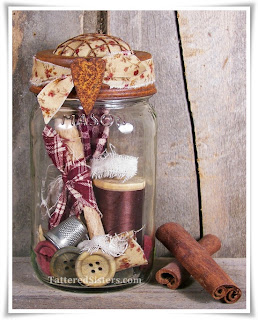
If you love to sew, or if you know someone else who does, here's a great project to keep on your list of Primitive Gifts you can give. It's my Primitive Mason Jar Sewing Kit. It combines my love of Mason Jars with my love of primitives and Vintage Goods, and some Rusty Tin too!

Primitive Mason Jar Sewing Kit

To make this you just need a vintage (or vintage-looking) Mason Jar, a rusty tin frog lid, a rusty tin heart, light gauge rusty wire (or any light gauge craft wire), fiberfill, a circle of your desired fabric--cut to the width of the inner top of the frog lid, scraps of fabric, an old spool of thread, various sewing notions, and hot glue.

The first thing I did was to work on turning the rusty tin frog lid into a pin cushion. I did this by first cutting 2 lengths of rusty wire a bit longer than the width of the lid (an inch or two longer or so). I attached each piece to the wire on the frog lid using needle nose pliers from underneath the lid. Once they were both attached I left the lid upside down, and then I took the circle of vintage-looking floral fabric I used and laid that on the mesh of the lid. Then I took a handful of fiberfill and formed it into a ball, and then pressed it into the concave area of the lid to make it fill the space. Once it was where I wanted it to be, I took each length of rusty wire that I previously attached (one at a time) and bent it back and forth and around over the exposed fiberfill, pushing it down so it would be flat and as even as possible with the base of the lid. The wire holds all the fiberfill in place, and helps keep it from being visible from the outside of the jar, so you want it tucked in as flat as possible. And using wire made it a quick and easy way to get all that fiberfill and the fabric to stay put.

Once the work of the pin cushion part of the lid was finished, I added a coordinating scrap of fabric to the edge of it, and then hot glued on a rusty tin heart. Then all that was left was to add the sewing notions to the jar. I added two scraps of fabric, each tied with torn strips of muslin. I also added a vintage clothespin tied up with homespun. I added a vintage spool of thread, a vintage thimble, and some wooden buttons too. You could add as many sewing notions as you want...needles, straight pins, tape measure, rusty safety pins, whatever!

Everything in this Mason Jar could be used for a prim or vintage sewing or craft project. And of course the top can be used as a pin cushion. But it would also just look cute as Primitive Home Decor in someone's laundry room or sewing room.


post signature

24 July 2011

Primitive Rag Doll Angel Tutorial

I've always wanted to try making some Primitive Dolls, but I never seem to get around to it. Sewing is really not something I'm the best at, so I trick to stick more to things I'm better at. But I decided to try my hand at a primitive doll after coming across a photo and tutorial of a rag doll angel. I saved the tutorial, and I even bookmarked that site so I could link to it from here. But can I find either of those now? No. Sigh. So for now I will tell you how I did it and if/when I come across the blog again where I saw the Primitive Tutorial I will update this post with that information...because I always like to give credit where credit is due!

I didn't even use the tutorial when I created my Primitive Rag Doll Angel. I just used the image of it from my head as inspiration, because it is super easy to make. And I knew I wasn't going to make mine look exactly the same as in the tutorial. I think it came out great and I just love it!

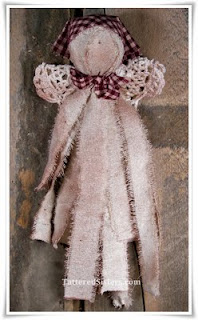
Primitive Rag Doll Angel
Supplies Needed
  • 6-12 strips of 16-20" torn muslin, or similar fabric (there is no right or wrong on sizes for this)
  • A 5" doily (I got mine really cheap at JoAnn Fabrics
  • A 6" square of homespun, your choice of color/pattern (for the head scarf)
  • A 1/2" strip of homespun for the angel's neck
  • A 2" Styrofoam Ball (preferably smooth foam)
  • Straight Pins
  • Tattered Angels Glimmer Mist in Coffee Shop color,  or your own Grungy Sauce (you can use my recipe found in the Grungy Hang Tag Tutorial if you like)
  • Rubber Bands
  • Hot Glue
Instructions
  1. Take your foam ball, your torn strips of muslin, and your straight pins and, one at a time, drape a strip over the ball, sticking a pin in the top of the ball through each strip to hold it in place (you could use hot glue for this instead if you like, but I wanted to work faster and without the heat of the glue). Lay the next strip in the opposite direction across the ball and pin in place. Continue this process using as many strips as it takes to completely cover the ball.
  2. Take a rubber band and twist it around the strips at the base of the ball multiple times, until it's secure. This gathers the strips to create a neck and also helps hold everything in place.
  3. Fold your homespun square in half to make a triangle and drape it across the doll's head, about half way back, to create a sort of bandana/scarf look. I used just a dab of hot glue in the middle of the front of the homespun to secure it to the head.
  4. Take your 1/2" homespun strip and tie it around the neck with a bow in the front.
  5. Fold your doily in half to create wings and hot glue it to the back of the angel; do it in a few places to make sure it stays put.
  6. Then take your Glimmer Mist and just spritz it all over until the doll is as grungy as you want it to be. If you are using your own Grungy Sauce you can spritz it on instead with a spray bottle and then let it dry. I like to use a heat gun to speed up the drying process.
And that's it! Your doll is finished. You can use the homespun tied around the neck to help hang this up on the wall. Or you could use an ornament hook to make it a little easier, or some rusty craft wire. I love that I created a really simple, no-sew primitive doll, and added to my collection of Grungy Goods in the process. I love grungy stuff! And there are so many ways you could vary this doll to give it your own creative and primitive touch.

post signature

18 July 2011

Primitive Crow Mason Jar

I just love using Mason Jars in crafting. So if I can find something new to do with one, then I do it. My latest creation combines my love of Mason Jars with my love of Primitive Crows. It's a Primitive Crow Mason Jar.

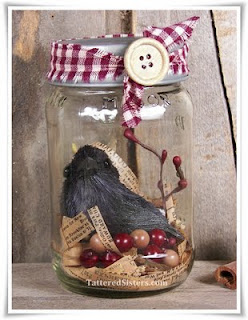
Primitive Crow Mason Jar


To make this I started with a simple square Mason Jar. I shredded up some tissue paper that has a vintage newsprint pattern on it and I put that in the bottom of the jar. Next I added a few stems of Pip Berries and a handful of berry-like bowl fillers I had on hand. Then I added a primitive crow; it's one I bought a few years ago at a craft store somewhere in the fall. I added a zinc lid to the jar that I topped with a homespun ribbon, and I finished it off with a wooden button.

So now this cute little jar is new Primitive Home Decor that has found a home in my kitchen. :)


post signature

17 July 2011

Primitive Sheep Altered Hangtag

While I was out in my studio yesterday I got the urge to draw a simple little Primitive Sheep! So I decided I'd do that and create an Altered Art Primitive Hangtag.

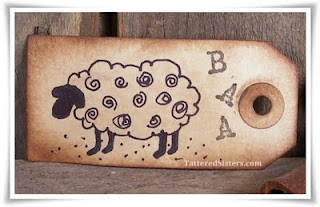
Primitive Sheep Altered Hangtag
I always have grungy hangtags in my studio as part of my regular supply of Grungy Goods that I use for crafting. So I started with the grungy hangtag and just drew on my primitive sheep, and I outlined it all in black permanent marker. Then I used some brown stamping ink all the way around the edges of the tag to distress it a bit more. And I just finished it off by stamping on the letters B-A-A in black ink. Now it's all finished and ready to be attached to a gift.

post signature

12 July 2011

Primitive Dough Bowl and Raggedy Flowers

Finally added my Raggedy Flowers primitive finds to the dough bowl on my dining room table. I needed a change of some of the things in that bowl, and I think the raggedy flowers look wonderful in my Primitive Home Decor.

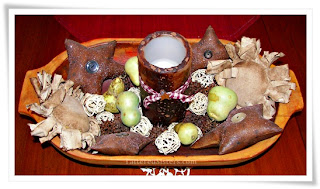
Dough Bowl and Raggedy Flowers
The flowers are sweetly scented Grungy Goods and are the perfect size Primitive Bowl Fillers for that dough bowl. It's so nice when I can find handmade primitives that I didn't necessarily have to make myself!

post signature

11 July 2011

Primitive Crow Box

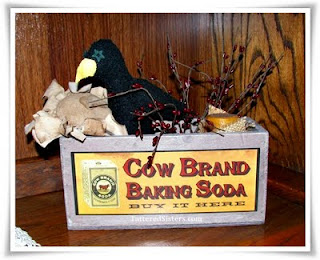
I had one Raggedy Flower left after adding a couple of my Primitive Finds to my dining room table dough bowl. So I decided to put it to good use and create this quick little Primitive Crow Box and fill it with a few primitive goodies.

Primitive Crow Box

I love Primitive Crows, so it's always fun to use them around the house. I added one that I made last spring to the box. I also added a spray of Pip Berries, the grungy Raggedy Flower, and also a little sugar cone style wax melt that is wrapped in burlap. It was just something quick and simple to do, but it adds a nice little primitive touch to my hutch. And I love it when Primitive Home Decor is just a gathering of things you already have on hand.

post signature

10 July 2011

Burlap Topiaries Primitive Tutorial

I just stumbled on a great Primitive Tutorial for making Burlap Topiaries. They are so neat and so easy to make I just had to share it with you!

Burlap Topiaries Primitive Tutorial


These awesome flowers are made by Tracy at The 2010's Housewife Blog. Please click on the link below to go directly to the tutorial on her blog, which has step-by-step instructions for making these.


These topiaries would make perfect Primitive Home Decor in any room of your home. I love how Tracy put hers in some vintage looking cans on a shelf. Burlap has such great texture and definitely creates a primitive feel, but you could use so many different fabrics for this project. Homespun would be great, even floral prints if you want a vintage or shabby flair! I'm definitely going to try some of these myself soon.

post signature

09 July 2011

Prim and Vintage Egg Basket

Time for another spotlight on some Vintage Goods and Primitive Home Decor items in my home. This time it's one of my favorite Primitive Finds, my vintage-looking egg basket.

Prim Vintage Egg Basket

I found this vintage style egg basket at a garage sale. I don't think it's actually vintage...I think it's just made to look that way. But I fell in love with it as soon as I saw it so I knew I had to buy it. I think I only paid $1.00 for it too. I was going to put some plastic eggs in it, but then I thought of a better idea: egg gourds!

Egg Gourds

Egg gourds are just gourds that look a lot like real eggs. They come in all sorts of shapes and sizes too. I found mine on Ebay. I got a whole big batch of them for not a lot of money. Some look more like eggs than others, so I just picked out the best ones and put them in my egg basket. I'll use the rest for some future craft projects.

post signature

03 July 2011

Primitive Long Johns

Here is another treasure I can add to my list of great Primitive Finds from a recent weekend getaway. It's some handmade Primitive Home Decor that looks like a set of miniature Primitive Long Johns!

Primitive Long Johns
These are actually made out of tube socks. Can you believe it? The two socks were grungy'd up so they are quite the primitive Grungy Goods too. They were sewn together and then little scraps of fabric were sewn on, as well as some cute little buttons down the center. The bottoms were tied with some twine and the whole thing has been attached to a wooden dowel with some vintage clothes pins. It was so adorable I just had to buy it. It's found a new home in my laundry room.


post signature

Grungy Flower Bowl Fillers

On a recent weekend getaway the Hubs and I did a lot of antiquing. One store we went to had an area of wonderful Primitive Finds inside. That's where I found these great Grungy Flower Bowl Fillers.

Grungy Flower Bowl Fillers
Aren't these wonderful Grungy Goods so cute and prim?! They are about 6" in diameter and they are so good and grungy. They also smell like a wonderful combination of vanilla, coffee, and cinnamon. You just can't beat that smell! I'm going to put these in the dough bowl on my dining room table, because they are the perfect Primitive Bowl Fillers. I've been wanting to put new stuff in there, so these will be wonderful.

post signature