25 February 2012

NAIH, Mom

I have not been blogging for the past week because my mother passed away. I'm still here and trying to get back to normal, whatever that is now. Just wanted to let you know that I will continue blogging when I am able. She would want me to continue being creative and doing what I love. 

NAIH, Mom
(Never Apart in Heart)
I Miss You

12 February 2012

Primitive Sugar Cones Recipe

There are lots of Primitive Recipes around in bloggy land for making Primitive Sugar Cones. A lot of them involve cooking the sugar with water in a pot, and well, I'm just too lazy for that. So I checked out a bunch of no-cook recipes and combined some into my own new recipe that I thought I'd share.

Primitive Sugar Cone

This recipe will usually make 2 medium Sugar Cones, but it will vary depending on the size of your molds.

Ingredients
  • 3 Cups of Dark Brown Sugar*
  • 3 Cups of White Granulated Sugar
  • 1 Cup of Water (you will not use it all)
  • 3 TBSP Instant Coffee Granules
  • Non-Stick Cooking Spray
  • Mold for the Sugar
  • Aluminum Foil
First of all, some notes: You don't have to use 2 kinds of sugar; you can use all Dark Brown Sugar, all White Sugar, or even all Light Brown Sugar. But I like the look of white and dark brown sugar, so that's what I used here. For a more solid look, then just use one type of sugar. Also, you don't have to use the Instant Coffee if you don't want. You can just use plain water. The coffee just adds an extra layer of scent, and a touch of darkness here and there. But it's totally optional. And also, for the sugar mold...you can use all sorts of things if you don't have an actual sugar mold: Styrofoam cups, paper cups, a fluted beer glass, or anything in your home that has a shape you like. You could also invest in a silicone candle mold that is shaped like a sugar cone, because you can buy them!

Directions
  1. Spray your mold(s) lightly with the non-stick cooking spray.
  2. In your cup of water dissolve the Instant Coffee (if you're just using water skip this step).
  3. Add your sugar to a large a bowl and use your fingers or a fork to get all of the lumps and clumps out.
  4. Dip your fingers in the water-coffee mixture (or plain water) and sprinkle the water from your fingers into the sugar. Work the water into the sugar with your hands. Repeat this process until the sugar becomes the consistency of wet sand. If your sugar gets too wet, add a little more sugar.
  5. Pack  your sugar, a little bit at a time, into your molds. Make sure you pack it good and solid and just do a little at a time to ensure that it gets tightly packed into the molds. Once your mold is full, you can take a table knife and level it off so that it will sit flat.
  6. Invert your molds onto a flat, foil-covered surface. A cookie sheet is perfect for this. Be careful when removing the mold so that the sugar cone stays solid and doesn't crumble. Take your time! 
  7. Once the sugar cones are released from the molds, they need to sit, untouched, in a cool, dry place for 3-7 days. Time will vary according to room temperature and humidity. But once they're finished they should become quite hard.
Your finished Primitive Sugar Cones can be wrapped in grungy muslin, cheesecloth, or ribbon, or even tied up with jute or homespun. Do a bit of Googling and you can find lots of examples of other Sugar Cones that may give you some more creative inspiration for presentation.

11 February 2012

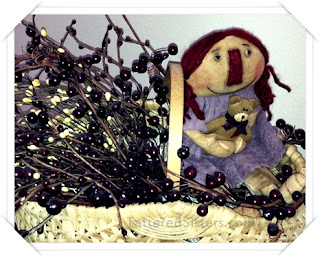
Primitive Doll n Berries Basket

I have a lot of Primitive Home Decor that I change around from time to time. Sometimes I change it with the seasons, sometimes I change some little thing just because I need a change. My Primitive Doll n Berries Basket is a good example of that.

Primitive Doll n Berries Basket

This basket sits on the table near my couch. It's always filled with Pip Berries, but I like to vary what other little goodies are in the basket from time to time. Right now, there's an adorable, handmade Primitive Doll in the basket with the Pip Berries. She was part of an ornie swap I was in a few years ago. I just loved her so much I wanted to keep her around the house, wherever I could find a spot. So she kind of travels around my home, finding new places to "live" now and again.

Part of living in tight financial times is cutting back on unnecessary purchases, and a lot of times home decor is just not necessary. So if I don't feel like making something, and if I can't afford to buy anything, moving things around in my home that I already have on hand is the best way to get a new look, without spending any money. I'm nothing if not cheap frugal!

I love my little Primitive Doll though. She is always smiling, she never asks for the remote control, and she brightens up my living room...without costing me a dime.

09 February 2012

I Was Featured at Craft Junkie Too

I want to send a quick Thank You to Tracy over at the Craft Junkie Too blog. She just featured my post on Who's Pinning You on Pinterest over on her blog.


Craft Junkie Too Friend

So nice of Tracy to feature my blog post on her blog. You really should check out her blog too. She has tons of great stuff there, and some wonderful link parties too, which I have participated in many times. Link Parties are such a great way to find new project new ideas, or new blogs to visit...or to get traffic to your own blog. 

Anyway, thanks again, Tracy!

Goodbye Google Friend Connect

I don't know how it's possible that I didn't know this until yesterday, but Google Friend Connect is going to disappear as of March 1st. Any non-Blogger blogs will be the first to suffer since GFC will stop functioning for those blogs first. Rumor has it that GFC will also stop for all Blogger/Blogspot blogs by the end of this year...though I can't confirm this. So what does that mean for you and me?

I, myself have some self-hosted WordPress blogs where I use GFC, plus my Tattered Sisters blog here at Blogger. I have lots of followers from GFC, and I have followed hundreds of blogs myself by joining them on their GFC box on their blogs. Unfortunately, once GFC ends, that means that any blogs I have followed using GFC will no longer appear in my Google Reader for my non-Blogger blogs that I follow. So not only do I need to add those blogs to my Google Reader manually so that I don't lose them, I also need to find a way to replace Google Friend Connect on my own blogs so that folks can continue to have an easy way to follow my blogs.


Fortunately, Brent Riggs over at Linky Tools, has created a wonderful new (and free!) widget tool to allow you to continue to get followers to your blogs. I just added mine today here at Tattered Sisters. You can see it at the top of the right column of the blog. You can get your own LinkyFollowers tool by clicking on the image above to be taken to their website. And feel free to follow me using the LinkyFollowers tool on the blog!

Oh, and if you're like me and use Google Reader, and you'd like to know how to Subscribe to blogs without using Google Friend Connect, here's what you do.

Go to your Google Reader, and you should see a Subscribe button at the top that looks like this:


Click on that and a box will open where you can enter a Blog/Feed's URL. Then click Add. That will add that blog to your Reader. And be sure to look at blogs while you're on them for options to subscribe via email, or via RSS Feed. Not all bloggers add those options, but I have both of them in my left column here at Tattered Sisters, to make it easier for people to follow me in those ways. Then it's just a matter of clicking a button or two and you can subscribe to those blogs in your favorite reader (or via email). So always be on the watch for those options when you are visiting blogs!

I really liked GFC, but since it's soon to be a thing of the past, we have to start exploring our other options now!

07 February 2012

Who's Pinning You on Pinterest

Do you want to find out who is pinning your fabulous creations you've posted on your blog, your recipes, and other pin-worthy goodies on Pinterest? 

Who's Pinning You on Pinterest

If so, it's really easy. Copy the URL below into a new browser window.

http://pinterest.com/source/tatteredsisters.com/

Replace tatteredsisters.com with the URL of your blog, or website or whatever. Then hit Enter on your keyboard. You'll be taken to a Pinterest page that displays every single thing from your blog or website that has been pinned on Pinterest.

How cool is that?

Add a Pin It Button to Your Posts

If you are like me, you may have a love of all things Pinterest. I recently added a Follow Me on Pinterest button link to the left side of my blog, but I wanted to be able to add a Pin It button to each of my posts as well. I found quite a few blogs that had tutorials on how to do this, but wanted to share with you the simplest method I've found for doing so. So this tutorial will show you how to add a Pinterest Pin It button to the bottom right of each post. Note that this is just for Blogger users. Follow the steps below.

1. First you need to download one of the Pin It buttons in my Box.net box below. You can use or make your own too, of course. But I wanted to provide some options for you to start with. So grab the one you like. Upload it to your favorite photo hosting site, and get its URL. You will need it later.


2. Next you need to go into your blog's Template area to edit the blog's HTML. In my blog it says Template, then Edit HTML, but yours might say Design then under that it would say Edit HTML. It just depends on which version of Blogger (old vs new) you are using.

3. Before you go any further BACKUP your blog's Template! You never can be too safe where your blog is concerned. So whenever I am going to edit my blog's HTML, I always back it up first. There is a button or link that says Backup/Restore. Click that and choose the option to Backup Full Template. I'm just going to say that I am not responsible for any issues with your blog as a result of you using my tutorial. But you will have no worries if a problem arises if you have backed up the Template first so that you can Restore it to its previous state if need be.

4. Next you need to click that Edit HTML link. It may give you a warning window about editing the HTML, so click Proceed or OK, or whatever option provided that lets you get to the HTML.

5. Then check the option that says Expand Widget Templates.

6. Now you need to use your browser's Edit > Find menu to search your Template for the following line of code: <div class='post-footer'>

7. Once you have found the footer code, copy and paste in the code below immediately beneath it:

<div style="float: right; margin: 4px;"><a href="javascript:void((function(){var%20e=document.createElement('script');e.setAttribute('type','text/javascript');e.setAttribute('charset','UTF-8');e.setAttribute('src','http://assets.pinterest.com/js/pinmarklet.js?r='+Math.random()*99999999);document.body.appendChild(e)})());"><img alt="Pin It" class="aligncenter" src="PutYourImageURLHere" border="0" /></a></div>

Replace the text that says PutYourImageURLHere with the actual URL of the image you uploaded to your photo host in Step 1.

8. Save your Template (or Preview it first to make sure you can see the Pin It button OK, then Save).

Note: If you want to make the Pin It button appear at the bottom left side of your posts instead of the bottom right, then replace <div style="float: right; margin: 4px;"> in that line of code with just <div>.

This is the exact way that I added my own Pin It button here at Tattered Sisters. If you use WordPress.com, I haven't found a way to add the Pin It button there, since there are restrictions and limits where the Template, JavaScript, and HTML are concerned. But if you have a self-hosted WordPress.org blog, there is a Plug In you can add now that I added to my Art Chick Studio blog last night. Click Here for --> WordPress Pin It Plugin

Ok gang, Happy Pinning!

04 February 2012

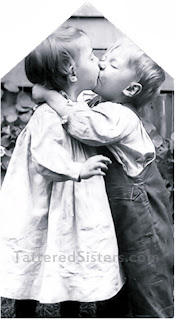
Kissing Kids Primitive Hangtag

With Valentine's Day right around the corner, I thought I'd make up a sheet of Primitive Hangtags that would be good for this love-filled holiday. So I've created my Kissing Kids hangtag!

Kissing Kids Primitive Hangtag

Just click on the image above and you'll be taken to a page with a PDF that contains 6 of the Kissing Kids hangtag, all ready for you to print out. And the printable versions do not have my watermark on them either. Hope you like these Primitive Freebies!

03 February 2012

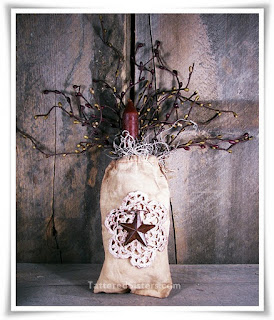
Grungy Candle Bag with Pip Berries

I felt like getting into some Grungy Goods again, so I decided to make this Grungy Candle Bag with Pip Berries.

Grungy Candle Bag with Pip Berries

I started by grungying up a plain muslin bag. Then I added a doily to the front of it, which I also grungy'd up a bit. Then I added some Pip Berries in burgundy and mustard color, along with a grungy Primitive Candle. I stuffed a wee bit of fiber fill into the bag to fill it out a bit, then I added some Spanish  moss at the top for some extra texture. And I finished it off with a Rusty Tin star on the front of the bag.